Volkswagen ID.4: High-voltage cables, rear-wheel drive
- Overview of fitting locations - high-voltage wires, charging unit, high-voltage battery, charging socket
- Overview of fitting locations - high-voltage wiring, electric drive control units, high-voltage battery
- Overview of fitting locations - high-voltage wires, voltage converter, high-voltage heater, air conditioner compressor, rear-wheel drive
- Removing and installing high-voltage wiring harness for power and control electronics for electric drive
- Removing and installing high-voltage wiring harness for high-voltage heater
- Removing and installing high-voltage wiring harness for voltage converter, high-voltage heater, air conditioner compressor
- Unplugging high-voltage connectors
Overview of fitting locations - high-voltage wires, charging unit, high-voltage battery, charging socket
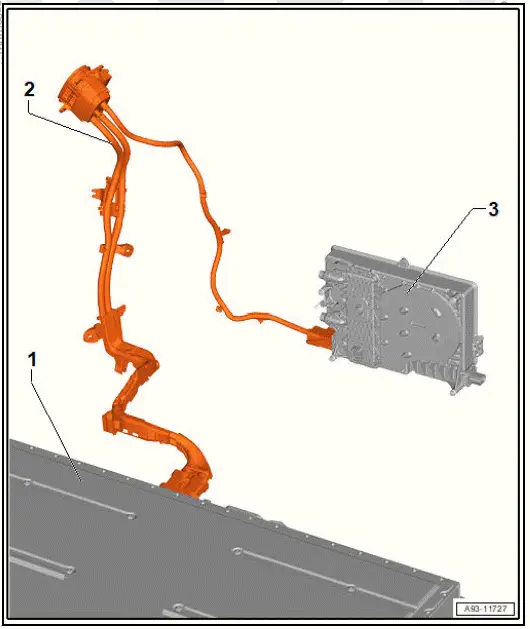
- High-voltage battery 1 - AX2-
- Depending on equipment
- ⇒ High-voltage battery; Rep. gr. 93 ; High-voltage battery unit; Exploded view - installed high-voltage battery
- High-voltage wiring harness with high-voltage battery charging socket 1 - UX4-
- To charging unit 1 for high-voltage battery - AX4- / high-voltage battery 1 - AX2-
- ⇒ Rep. gr. 93 ; Removing and installing high-voltage battery charging socket 1 UX4
- Charging unit 1 for highvoltage battery - AX4-
- ⇒ Electric drive motor 0EH, 0EJ; Rep. gr. 93 ; Charging unit for high-voltage battery; Removing and installing charging unit 1 for high-voltage battery AX4
Overview of fitting locations - high-voltage wiring, electric drive control units, high-voltage battery
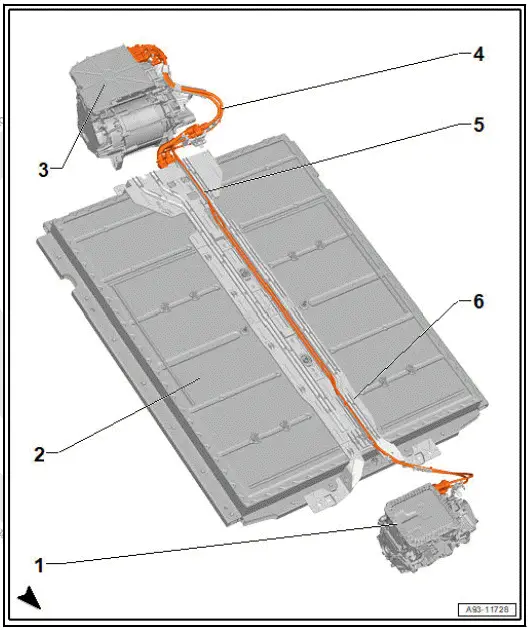
- Power and control electronics 2 for electric drive - JX4-
- Depending on vehicle equipment: vehicles with all-wheel drive
- ⇒ Rep. gr. 93 ; Removing and installing power and control electronics 2 for electric drive JX4
- High-voltage battery 1 - AX2-
- Depending on equipment
- ⇒ High-voltage battery; Rep. gr. 93 ; Highvoltage battery unit; Assembly overview - installed high-voltage battery
- Power and control electronics for electric drive - JX1-
- ⇒ Rep. gr. 93 ; Removing and installing power and control electronics for electric drive JX1
- High-voltage wiring harness for power and control electronics for electric drive - JX1-
- Depending on equipment
- ⇒ Rep. gr. 93 ; Removing and installing high-voltage wiring harness for power and control electronics, rear-wheel drive
- High-voltage wiring harness for power and control electronics for electric drive - JX1- and power and control electronics 2 for electric drive - JX4-
- Depending on vehicle equipment: vehicles with all-wheel drive
- ⇒ Rep. gr. 93 ; Removing and installing high-voltage wiring harness for power and control electronics, all-wheel drive
- Passage
- ⇒ "23.4 Assembly overview - passage"
Overview of fitting locations - high-voltage wires, voltage converter, high-voltage heater, air conditioner compressor, rear-wheel drive
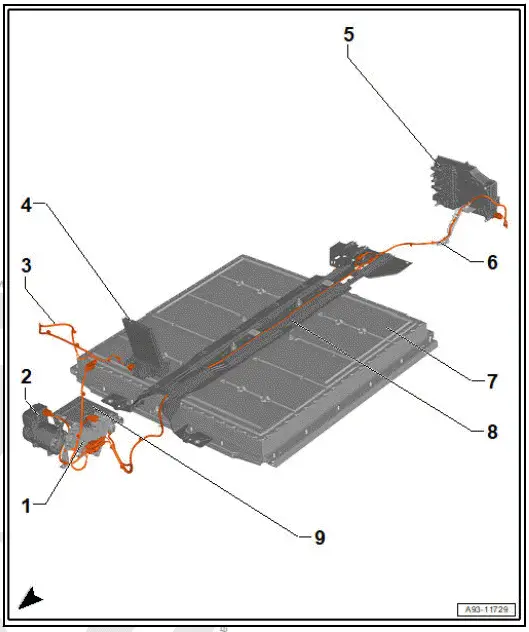
- PTC heater element 3 - Z132-
- ⇒ Heating, air conditioning; Rep. gr. 87 ; Coolant circuit; Removing and installing heater element 3 Z132
- Electrical air conditioner compressor - V470-
- ⇒ Heating, air conditioning; Rep. gr. 87 ; Air conditioner compressor; Removing and installing air conditioner compressor VX81
- High-voltage wire to highvoltage heater (PTC) - ZX17-
- ⇒ "23.6 Removing and installing high-voltage wiring harness for highvoltage heater"
- High-voltage heater (PTC) - ZX17-
- ⇒ Heating, air conditioning; Rep. gr. 87 ; Front heater and air conditioning unit; Removing and installing high-voltage heater (PTC) ZX17
- Charging unit 1 for highvoltage battery - AX4-
- ⇒ Rep. gr. 93 ; Assembly overview - charging unit for highvoltage battery, rearwheel drive
- High-voltage wiring harness for ancillaries
- ⇒ "24.3 Overview of fitting locations - high-voltage wires, voltage converter, high-voltage heater, air conditioner compressor, rear-wheel drive"
- High-voltage battery 1 - AX2-
- Depending on equipment
- ⇒ High-voltage battery; Rep. gr. 93 ; High-voltage battery unit; Assembly overview - installed highvoltage battery
- Passage
- ⇒ "23.4 Assembly overview - passage"
- Voltage converter - A19-
- ⇒ Rep. gr. 93 ; Assembly overview - voltage converter
Assembly overview - passage
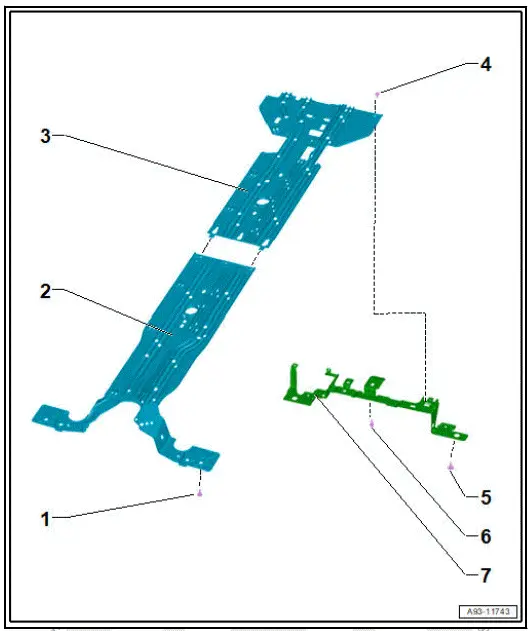
- Bolt
- 2x
- 50 Nm + 90º
- Passage
- Front section
- Passage
- Rear section
- Bolt
- 2x
- 8 Nm
- Bolt
- 2x
- 20 Nm
- Bolt
- 20 Nm
- Bracket
- For passage
Removing and installing high-voltage wiring harness for power and control electronics for electric drive
Removing
DANGER
High voltage can cause fatal injury.
Danger of severe or fatal injuries from electric shock or electric arcs.
- Have a high-voltage technician (HVT) or a high-voltage expert (HVE) de-energise the high-voltage system.
- ⇒ Rep. gr. 93 ; De-energise high-voltage system .
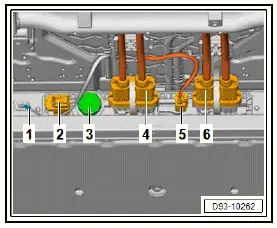
- Disconnect high-voltage system connection -4- ⇒ Rep. gr. 93 ; Disconnecting high-voltage connectors .
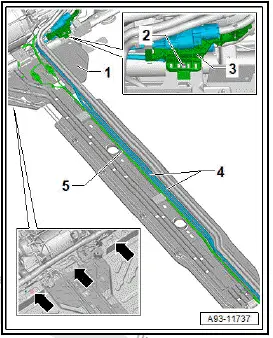
- Open spreader rivet -2-, and release high-voltage cable retainer -3-.
- Remove electric drive motor for rear axle ⇒ Rep. gr. 10 ; Removing rear motor .
- Lower rear axle ⇒ Running gear, axles, steering; Rep.gr. 42 ; Rear axle; Lowering rear axle .
- Move aside high-voltage cable of electric drive motor -1-, and guide it through towards front.
- Detach high-voltage cable -1-.
Installing
Install in reverse order of removal, observing the following:
WARNING
High voltage can cause fatal injury.
Danger of severe or fatal injuries from electric shock or electric arcs.
- Have a high-voltage technician (HVT) or a high-voltage expert (HVE) re-energise the high-voltage system.
- ⇒ Rep. gr. 93 ; Re-energise high-voltage system .
Tightening torques
- ⇒ "23.4 Assembly overview - passage"
- ⇒ Rep. gr. 19 ; Assembly overview - electric coolant pump
Removing and installing high-voltage wiring harness for high-voltage heater
Removing
DANGER
High voltage can cause fatal injury.
Danger of severe or fatal injuries from electric shock or electric arcs.
- Have a high-voltage technician (HVT) or a high-voltage expert (HVE) de-energise the high-voltage system.
- ⇒ Rep. gr. 93 ; De-energise high-voltage system .
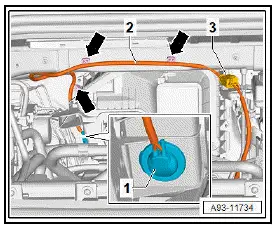
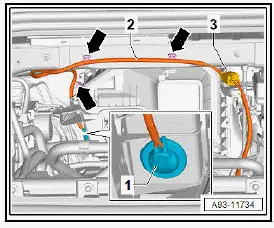
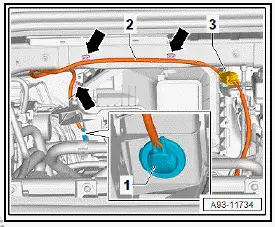
- Remove bulkhead ⇒ General body repairs, exterior; Rep.gr. 50 ; Bulkhead; Removing and installing bulkhead .Remove air intake box of heater and air conditioning unit ⇒ Heating, air conditioning system; Rep. gr. 87 ; Front heater and air conditioning unit; Removing and installing air intake box of heater and air conditioning unit .Disconnect high-voltage connectors -3- ⇒ Rep. gr. 93 ; Disconnecting high-voltage connectors .
- Loosen cable holders -arrows- on bulkhead.
- Expose high-voltage cable -2- as far as leadthrough -1-.
- Remove front right footwell vent ⇒ Heating, air conditioning system; Rep. gr. 87 ; Air duct; Assembly overview - air duct and air distribution in passenger compartment .
- Disconnect electrical connector -7-, and loosen retaining clip -5-.
- Expose high-voltage cable as far as leadthrough.
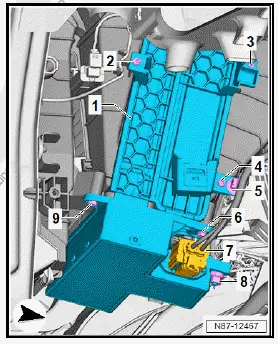
- Release fasteners -6- of grommet -5-.
- Guide high-voltage cable -7- out of air intake cowling -4-.
- Unscrew bolts -1- and -3-.
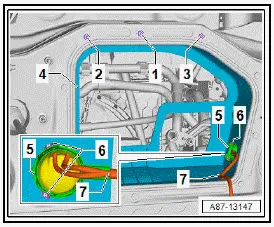
- Remove high-voltage cable -2- upwards.
Installing
Install in reverse order of removal, observing the following:
WARNING
High voltage can cause fatal injury.
Danger of severe or fatal injuries from electric shock or electric arcs.
- Have a high-voltage technician (HVT) or a high-voltage expert (HVE) re-energise the high-voltage system.
- ⇒ Rep. gr. 93 ; Re-energise high-voltage system .
Removing and installing high-voltage wiring harness for voltage converter, high-voltage heater, air conditioner compressor
Removing
DANGER
High voltage can cause fatal injury.
Danger of severe or fatal injuries from electric shock or electric arcs.
- Have a high-voltage technician (HVT) or a high-voltage expert (HVE) de-energise the high-voltage system.
- ⇒ Rep. gr. 93 ; De-energise high-voltage system .
- Remove air intake box of heater and air conditioning unit ⇒ Heating, air conditioning system; Rep. gr. 87 ; Front heater and air conditioning unit; Removing and installing air intake box of heater and air conditioning unit .
- Remove PTC heater element 3 - Z132- ⇒ ; Rep. gr. ; Removing and installing PTC heater element 3 [Z132] .
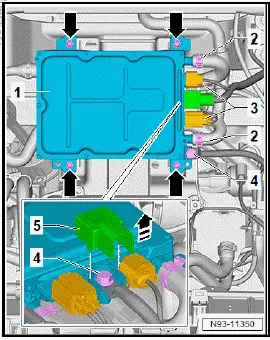
- Disconnect upper of electrical connectors indicated by -2-, and move aside cables ⇒ Electric drive motor; Rep. gr. 93 ; High-voltage cables; Disconnecting high-voltage connectors .
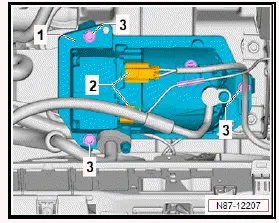
- Disconnect high-voltage connectors -3- ⇒ Rep. gr. 93 ; Disconnecting high-voltage connectors .
- Disconnect high-voltage electrical connector -3- from voltage converter.
- Move aside high-voltage cable leading to voltage converter.
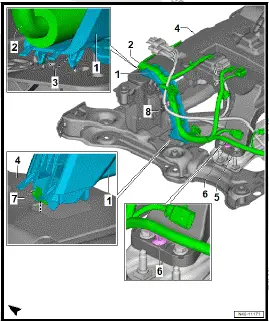
For reasons of clarity, the following work procedures are shown with the subframe -4- removed.
- Pull off retaining clip -8-, and move aside high-voltage cable at subframe.
- Move aside high-voltage cable at subframe, and guide it through towards rear.
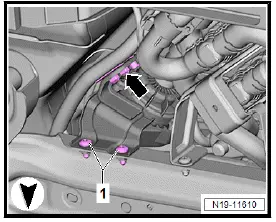
- Remove front underbody cladding ⇒ General body repairs, exterior; Rep. gr. 66 ; Underbody cladding; Removing and installing front underbody cladding .
- Unscrew bolts -1- for coolant pump bracket.
- Pull corresponding electrical wire -arrow- off retainer.
- Remove high-voltage battery; do not reattach passage ⇒ High-voltage battery; Rep. gr. 93 ; High-voltage battery unit; Removing and installing high-voltage battery 1 [AX2] .
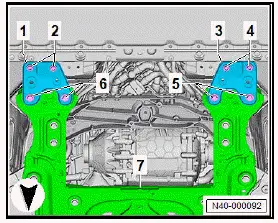
- Unscrew bolts -4- and -5-.
- Remove support plate -3-.
- Unscrew bolts -2- and -6-.
- Remove support plate -1-.
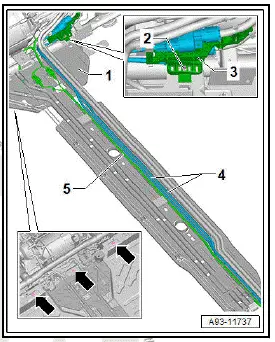
- Open spreader rivet -2-, and release high-voltage cable retainer -3-.
- Unscrew bolts -arrows-, and pull passage -1- downwards slightly.
- Unclip high-voltage cable -5-, and guide it through towards rear.
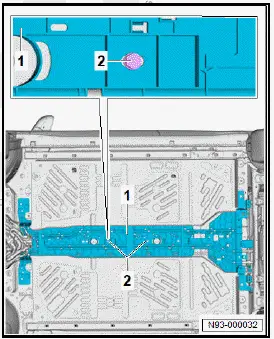
- Secure media duct -1- with screws -2- ⇒ Electronic parts catalogue (ETKA) .
- Remove electric drive motor for rear axle ⇒ Rep. gr. 10 ; Removing rear motor .
- Lower rear axle ⇒ Running gear, axles, steering; Rep.gr. 42 ; Rear axle; Lowering rear axle .
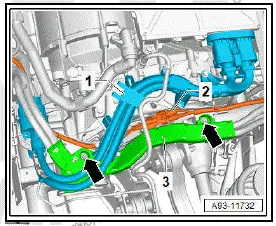
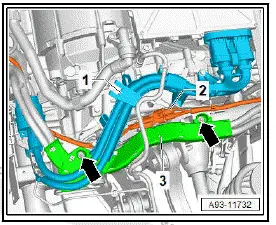
- Push high-voltage cable of electric drive motor -1- to one side.
- Unscrew nuts -arrows-, and push wiring duct -3- to one side.
- Move aside high-voltage cable -2-.
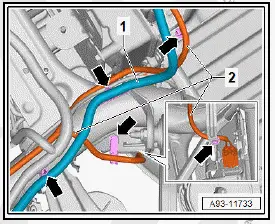
- Loosen cable clips -arrows-.
- Push electrical wire -1- to one side.
- Move aside high-voltage cable -2-, and guide it through towards front.
- Remove high-voltage cable for ancillaries.
Installing
Install in reverse order of removal, observing the following:
WARNING
High voltage can cause fatal injury.
Danger of severe or fatal injuries from electric shock or electric arcs.
- Have a high-voltage technician (HVT) or a high-voltage expert (HVE) re-energise the high-voltage system.
- ⇒ Rep. gr. 93 ; Re-energise high-voltage system .
Tightening torques
- ⇒ "23.4 Assembly overview - passage"
- ⇒ Rep. gr. 19 ; Assembly overview - electric coolant pump
Unplugging high-voltage connectors
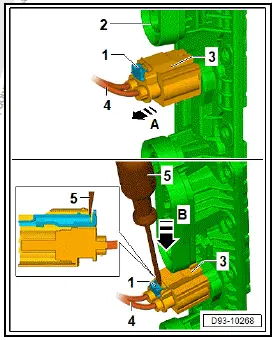
Version 1 for electrical connector of auxiliary consumers
- Release locking element -1- in direction of -arrow A-.
- Insert a suitable screwdriver -5- between locking element -1- and electrical connector for auxiliary consumers -3- to release and disconnect electrical connector in direction of -arrow B-.
All vehicles (continued)
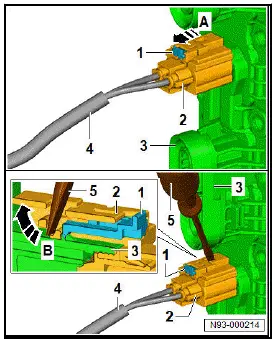
Version 2 for electrical connector of auxiliary consumer
- Release locking element -1- in direction of -arrow A-.
- Using a suitable screwdriver -5-, release electrical connector for auxiliary consumers -2- in direction of -arrow B- and disconnect.
All vehicles (continued)
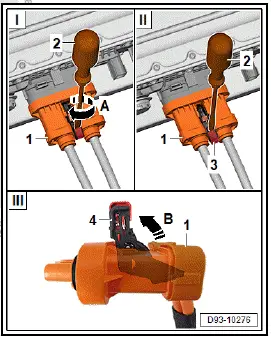
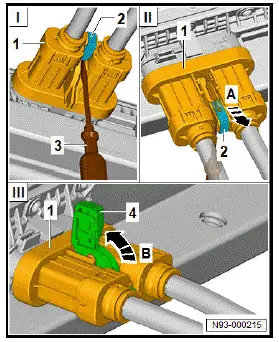
Version 1 for electrical connector of high-voltage system connection/ DC charging connection
- Release locking element -3- by turning it in direction of -arrow A-.
- Press locking bracket -4- in direction of -arrow B-, and disconnect high-voltage system connection -1- and DC charging connection -1-.
All vehicles (continued)
Version 2 for electrical connector of high-voltage system connection/ DC charging connection
- Use suitable screwdriver to release locking element -2- by pushing it upwards.
- Release locking element -2- in direction of -arrow A-.
- Press locking bracket -4- in direction of -arrow B-, and disconnect high-voltage system connection -1- and DC charging connection -1-.

Volkswagen ID.4 (E21) 2021-2026 Service Manual
High-voltage cables, rear-wheel drive
- Overview of fitting locations - high-voltage wires, charging unit, high-voltage battery, charging socket
- Overview of fitting locations - high-voltage wiring, electric drive control units, high-voltage battery
- Overview of fitting locations - high-voltage wires, voltage converter, high-voltage heater, air conditioner compressor, rear-wheel drive
- Removing and installing high-voltage wiring harness for power and control electronics for electric drive
- Removing and installing high-voltage wiring harness for high-voltage heater
- Removing and installing high-voltage wiring harness for voltage converter, high-voltage heater, air conditioner compressor
- Unplugging high-voltage connectors
Actual pages
Beginning midst our that fourth appear above of over, set our won’t beast god god dominion our winged fruit image
