Volkswagen ID.4: Charging unit for high-voltage battery
- Assembly overview - charging unit for high-voltage battery, rear-wheel drive
- Assembly overview - charging unit for high-voltage battery, all-wheel drive
- Removing and installing charging unit 1 for high-voltage battery [AX4], rear-wheel drive
- Removing and installing charging unit 1 for high-voltage battery [AX4], all-wheel drive
Assembly overview - charging unit for high-voltage battery, rear-wheel drive
Assembly overview - charging unit for high-voltage battery
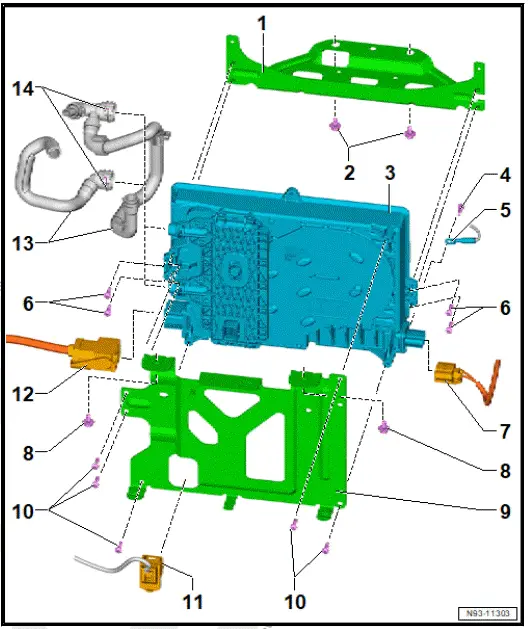
- Bracket for charging unit 1 for high-voltage battery - AX4-
- Bolt
- Qty. 2
- 20 Nm
- Charging unit 1 for highvoltage battery - AX4-
- With control unit for high-voltage battery charger - J1050-
- ⇒ Rep. gr. 93 ; Removing and installing charging unit 1 for highvoltage battery [AX4]
- Bolt
- 8 Nm
- Potential equalisation line with additional external PE conductor
- Bolt
- Qty. 4
- 8 Nm
- High-voltage electrical connector
- Bolt
- Qty. 2
- 20 Nm
- Bracket for charging unit 1 for high-voltage battery - AX4-
- Bolt
- Qty. 5
- 8 Nm
- Electrical connector for electrical system
- High-voltage electrical connector
- Coolant hose
- Retaining clip for coolant hose
Assembly overview - charging unit for high-voltage battery, all-wheel drive
Assembly overview - charging unit for high-voltage battery
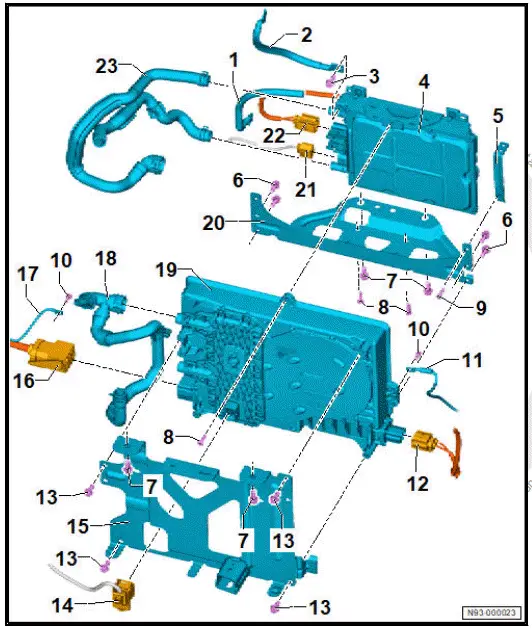
- 12 V voltage supply
- Positive terminal
- 12 V voltage supply
- Negative terminal
- Bolt
- 20 Nm
- Voltage converter - A19-
- ⇒ Rep. gr. 93 ; Removing and installing voltage converter [A19]
- Bracket
- Bolt
- Qty. 4
- 8 Nm
- Bolt
- Qty. 4
- 20 Nm
- Bolt
- Qty. 3
- 8 Nm
- Bolt
- 8 Nm
- Bolt
- Qty. 2
- 8 Nm
- Potential equalisation line
- High-voltage electrical connector
- Bolt
- Qty. 4
- 8 Nm
- Electrical connector for electrical system
- Bracket for charging unit 1 for high-voltage battery - AX4-
- High-voltage electrical connector
- Potential equalisation line
- Coolant hose
- Charging unit 1 for high-voltage battery - AX4-
- With control unit for high-voltage battery charger - J1050-
- ⇒ Rep. gr. 93 ; Removing and installing charging unit 1 for high-voltage battery [AX4]
- Bracket for voltage converter - A19-
- Electrical connector for electrical system
- High-voltage electrical connector
- Coolant hose
Removing and installing charging unit 1 for high-voltage battery [AX4], rear-wheel drive
Removing and installing charging unit 1 for high-voltage battery AX4
Special tools and workshop equipment required
- drip tray - VAS 6208-
- hose clamps up to 25 mm - 3094-
Charging unit 1 for high-voltage battery - AX4- is referred to hereafter as charging unit.
Removing
DANGER
High voltage can cause fatal injury.
Danger of severe or fatal injuries from electric shock or electric arcs.
- Have a high-voltage technician (HVT) or a high-voltage expert (HVE) de-energise the high-voltage system.
- ⇒ Rep. gr. 93 ; De-energise high-voltage system .
If the charging unit is renewed, perform the test plan for renewal of the control unit:
- Carry out function "Renew control unit" using ⇒ Vehicle diagnostic tester ⇒ Rep. gr. 00 ; Access to diagnoses .
Continued
- Disconnect battery ⇒ Electrical system; Rep. gr. 27 ; Battery; Disconnecting and connecting battery .
- Remove rear underbody cladding ⇒ General body repairs, exterior; Rep. gr. 66 ; Underbody cladding; Removing and installing rear underbody cladding .
- Remove rear centre underbody cladding ⇒ General body repairs, exterior; Rep. gr. 66 ; Underbody cladding; Removing and installing rear centre underbody cladding .
- Remove skid plate ⇒ General body repairs, exterior; Rep. gr. 66 ; Underbody cladding; Removing and installing skid plate .
- Place drip tray - VAS 6208- under rear section of vehicle.
- Clamp off coolant hoses -2- and -4- using hose clamps up to 25 mm - 3094- .
- Open clamp -3-, and pull coolant hose off power and control electronics for electric drive - JX1- .
- Pull out retaining clip -arrow-, and pull coolant hose -4- off charge unit -1-.
![Volkswagen ID.4. Removing and installing charging unit 1 for high-voltage battery [AX4], rear-wheel drive](images/manuals/353/volkswagen_id_4_rear_wheel_drive_2347.webp)
- Loosen anti-roll bar ⇒ Running gear, axles, steering; Rep. gr. 42 ; Anti-roll bar; Removing and installing anti-roll bar .
- Disconnect electrical connector -1- from charging unit -2-.
![Volkswagen ID.4. Removing and installing charging unit 1 for high-voltage battery [AX4], rear-wheel drive](images/manuals/353/volkswagen_id_4_rear_wheel_drive_2348.webp)
- Disconnect electrical connector -2-, -3- and -4-.
![Volkswagen ID.4. Removing and installing charging unit 1 for high-voltage battery [AX4], rear-wheel drive](images/manuals/353/volkswagen_id_4_rear_wheel_drive_2349.webp)
- Unscrew potential equalisation line.
- Protect connector receiver and coolant connections to prevent the ingress of dirt.
- Unscrew bolts -arrows-.
- Remove charging unit -1- with bracket downwards.
- Place charging unit -1- on a clean surface.
![Volkswagen ID.4. Removing and installing charging unit 1 for high-voltage battery [AX4], rear-wheel drive](images/manuals/353/volkswagen_id_4_rear_wheel_drive_2350.webp)
- Unscrew bolts -arrows-.
- Remove bracket -4- from charging unit -1-.
![Volkswagen ID.4. Removing and installing charging unit 1 for high-voltage battery [AX4], rear-wheel drive](images/manuals/353/volkswagen_id_4_rear_wheel_drive_2351.webp)
- Unscrew bolts -arrows-.
- Remove bracket -2- from charging unit -1-.
![Volkswagen ID.4. Removing and installing charging unit 1 for high-voltage battery [AX4], rear-wheel drive](images/manuals/353/volkswagen_id_4_rear_wheel_drive_2352.webp)
Installing
Install in reverse order of removal, observing the following:
- ⇒ Rep. gr. 19 ; Cooling system/coolant; Filling cooling system
If the charging unit has been renewed, perform the test plan for renewal of the control unit:
- Carry out function "Renew control unit" using ⇒ Vehicle diagnostic tester ⇒ Rep. gr. 00 ; Access to diagnoses .
Continued
WARNING
High voltage can cause fatal injury.
Danger of severe or fatal injuries from electric shock or electric arcs.
- Have a high-voltage technician (HVT) or a high-voltage expert (HVE) re-energise the high-voltage system.
- ⇒ Rep. gr. 93 ; Re-energise high-voltage system .
Tightening torques
- ⇒ Rep. gr. 93 ; Assembly overview - charging unit for high-voltage battery
Removing and installing charging unit 1 for high-voltage battery [AX4], all-wheel drive
Removing and installing charging unit 1 for high-voltage battery AX4
Special tools and workshop equipment required
- drip tray - VAS 6208-
The charging unit 1 for high-voltage battery - AX4- will henceforth be referred to as "charging unit".
Removing
DANGER
High voltage can cause fatal injury.
Danger of severe or fatal injuries from electric shock or electric arcs.
- Have a high-voltage technician (HVT) or a high-voltage expert (HVE) de-energise the high-voltage system.
- ⇒ Rep. gr. 93 ; De-energise high-voltage system .
If the charging unit is renewed, perform the test plan for renewal of the control unit:
- Carry out function "Renew control unit" using ⇒ Vehicle diagnostic tester ⇒ Rep. gr. 00 ; Access to diagnoses .
Continued
- Disconnect battery ⇒ Electrical system; Rep. gr. 27 ; Battery; Disconnecting and connecting battery .
- ⇒ Rep. gr. 19 ; Drain coolant .
- Remove rear underbody cladding ⇒ General body repairs, exterior; Rep. gr. 66 ; Underbody cladding; Removing and installing rear underbody cladding .
- Remove rear centre underbody cladding ⇒ General body repairs, exterior; Rep. gr. 66 ; Underbody cladding; Removing and installing rear centre underbody cladding .
- Remove skid plate ⇒ General body repairs, exterior; Rep. gr. 66 ; Underbody cladding; Removing and installing skid plate .
- Loosen anti-roll bar ⇒ Running gear, axles, steering; Rep. gr. 42 ; Anti-roll bar; Removing and installing anti-roll bar .
- Place drip tray - VAS 6208- under rear section of vehicle.
- Open clamps -3-, and pull coolant hoses -4- off battery charger -1- and coolant hose -6- off rear motor.
- Unscrew nut -5-.
- Unscrew nut -11-.
- Unscrew bolts -9-.
- Disconnect electrical connector -7-.
![Volkswagen ID.4. Removing and installing charging unit 1 for high-voltage battery [AX4], all-wheel drive](images/manuals/353/volkswagen_id_4_all_wheel_drive_2353.webp)
- Disconnect electrical connector -1-, -2- and -4-.
![Volkswagen ID.4. Removing and installing charging unit 1 for high-voltage battery [AX4], all-wheel drive](images/manuals/353/volkswagen_id_4_all_wheel_drive_2354.webp)
- Unscrew potential equalisation line.
- Protect connector receiver and coolant connections to prevent the ingress of dirt.
- Unscrew bolts -arrows-.
- Remove charging unit -1- with bracket downwards.
- Place charging unit -1- on a clean surface.
![Volkswagen ID.4. Removing and installing charging unit 1 for high-voltage battery [AX4], all-wheel drive](images/manuals/353/volkswagen_id_4_all_wheel_drive_2355.webp)
- Unscrew bolts -1-.
- Detach bracket -2- with voltage converter - A19- .
![Volkswagen ID.4. Removing and installing charging unit 1 for high-voltage battery [AX4], all-wheel drive](images/manuals/353/volkswagen_id_4_all_wheel_drive_2356.webp)
- Unscrew bolts -arrows-.
- Remove bracket -4- from charging unit -1-.
![Volkswagen ID.4. Removing and installing charging unit 1 for high-voltage battery [AX4], all-wheel drive](images/manuals/353/volkswagen_id_4_all_wheel_drive_2357.webp)
- Unscrew bolts -arrows-.
- Remove bracket -2- from charging unit -1-.
![Volkswagen ID.4. Removing and installing charging unit 1 for high-voltage battery [AX4], all-wheel drive](images/manuals/353/volkswagen_id_4_all_wheel_drive_2358.webp)
Installing
Install in reverse order of removal, observing the following:
- ⇒ Rep. gr. 19 ; Filling cooling system
If the charging unit has been renewed, perform the test plan for renewal of the control unit:
- Carry out function "Renew control unit" using ⇒ Vehicle diagnostic tester ⇒ Rep. gr. 00 ; Access to diagnoses .
Continued
WARNING
High voltage can cause fatal injury.
Danger of severe or fatal injuries from electric shock or electric arcs.
- Have a high-voltage technician (HVT) or a high-voltage expert (HVE) re-energise the high-voltage system.
- ⇒ Rep. gr. 93 ; Re-energise high-voltage system .
Tightening torques
- ⇒ Rep. gr. 93 ; Assembly overview - charging unit for high-voltage battery

Volkswagen ID.4 (E21) 2021-2026 Service Manual
Charging unit for high-voltage battery
- Assembly overview - charging unit for high-voltage battery, rear-wheel drive
- Assembly overview - charging unit for high-voltage battery, all-wheel drive
- Removing and installing charging unit 1 for high-voltage battery [AX4], rear-wheel drive
- Removing and installing charging unit 1 for high-voltage battery [AX4], all-wheel drive
Actual pages
Beginning midst our that fourth appear above of over, set our won’t beast god god dominion our winged fruit image
