Volkswagen ID.4: Control motors, vehicles without air conditioner operating unit at rear
- Overview of fitting locations - control motors (front)
- Exploded view - control motors (front)
- Removing and installing control motor for front left temperature flap [VX34], LHD vehicles
- Removing and installing control motor for front left temperature flap [VX34], right-hand drive vehicles
- Removing and installing control motor for front right temperature flap [VX35], left-hand drive vehicles
- Removing and installing control motor for front right temperature flap [VX35], right-hand drive vehicles
- Removing and installing control motor for defroster flap VX47
- Removing and installing control motor for front left air distribution flap [VX93], left-hand drive vehicles
- Removing and installing control motor for front left air distribution flap [VX93], right-hand drive vehicles
- Removing and installing control motor for front right air distribution flap [VX94], left-hand drive vehicles
- Removing and installing control motor for front right air distribution flap [VX94], right-hand drive vehicles
- Removing and installing control motor for fresh air and air recirculation flap [VX96]
- Removing and installing actuator for left air distribution flap
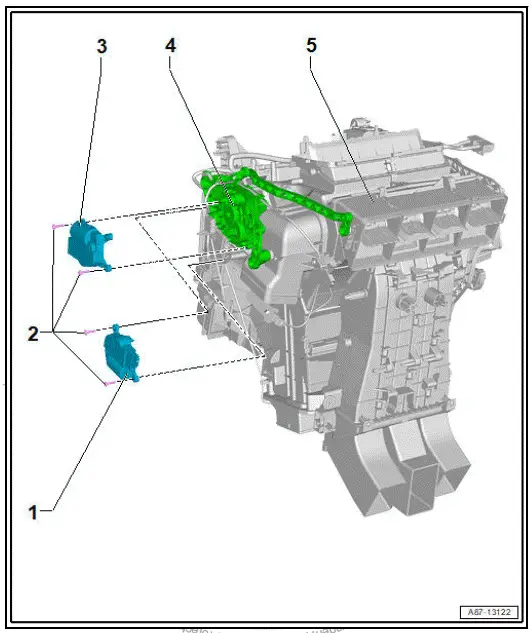
Overview of fitting locations - control motors (front)

- Control motor for fresh air and air recirculation flap - VX96-
- With fresh air/air recirculation, air flow flap control motor - V425-
- With potentiometer for fresh air/air recirculation, air flow flap control motor - G644-
- ⇒ Rep. gr. 87 ; Removing and installing control motor for fresh air and air recirculation flap VX96
Control motor for front left temperature flap - VX34-
- With left temperature flap control motor - V158-
- With potentiometer for left temperature flap control motor - G220-
- ⇒ Rep. gr. 87 ; Removing and installing front left temperature flap VX34
- Control motor for front left air distribution flap - VX93-
- With front left air distribution flap control motor - V706-
- With potentiometer for front left air distribution flap control motor - G1105-
- Rep. gr. 87 ; Removing and installing front left air distribution flap control motor VX93
- Control motor for rear temperature flap - VX95-
- Depending on equipment/vehicle version
- With rear temperature flap control motor - V137-
- With potentiometer for rear temperature flap motor - G479-
- ⇒ Rep. gr. 87 ; Removing and installing control motor for rear temperature flap VX95
- Control motor for front right air distribution flap - VX94-
- With front right air distribution flap control motor - V707-
- With potentiometer for front right air distribution flap control motor - G1106-
- ⇒ Rep. gr. 87 ; Removing and installing control motor for front right air distribution flap VX94
- Control motor for front right temperature flap - VX35-
- With right temperature flap control motor - V159-
- With potentiometer for right temperature flap control motor - G221-
- ⇒ Rep. gr. 87 ; Removing and installing control motor for front right temperature flap VX35
- Control motor for defroster flap - VX47-
- With defroster flap control motor - V107-
- With potentiometer for defroster flap control motor - G135-
- ⇒ Rep. gr. 87 ; Removing and installing control motor for defroster flap VX47
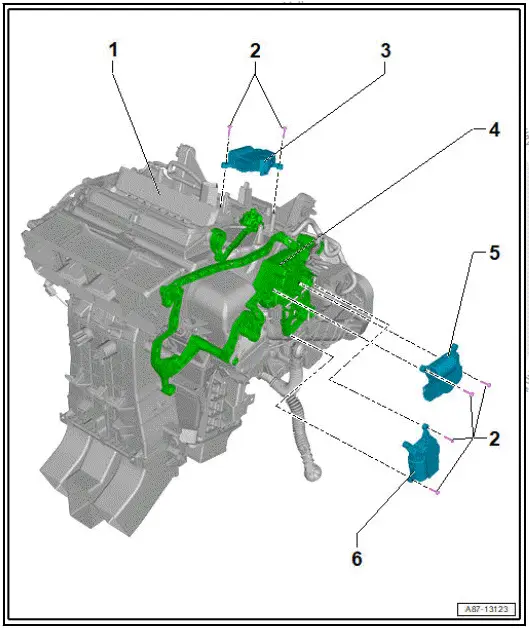
Exploded view - control motors (front)
Exploded view - control motors (front left)
- Control motor for front left temperature flap - VX34-
- ⇒ Rep. gr. 87 ; Removing and installing control motor for front left temperature flap VX34
- Bolt
- 1.5 Nm
- Control motor for front left air distribution flap - VX93-
- ⇒ Rep. gr. 87 ; Removing and installing control motor for front left air distribution flap VX93 - left-hand drive vehicles
- Actuator
- Heater and air conditioning unit
- ⇒ Rep. gr. 87 ; Removing and installing heater and air conditioning unit
Exploded view - control motors (front right)
- Heater and air conditioning unit
- ⇒ Rep. gr. 87 ; Removing and installing heater and air conditioning unit
- Bolt
- 1.5 Nm
- Control motor for defroster flap - VX47-
- ⇒ Rep. gr. 87 ; Removing and installing control motor for defroster flap VX47
- Actuator
- Control motor for front right air distribution flap - VX94-
- ⇒ Rep. gr. 87 ; Removing and installing control motor for front right air distribution flap VX94
- Control motor for front right temperature flap - VX35-
- ⇒ Rep. gr. 87 ; Removing and installing control motor for front right temperature flap VX35
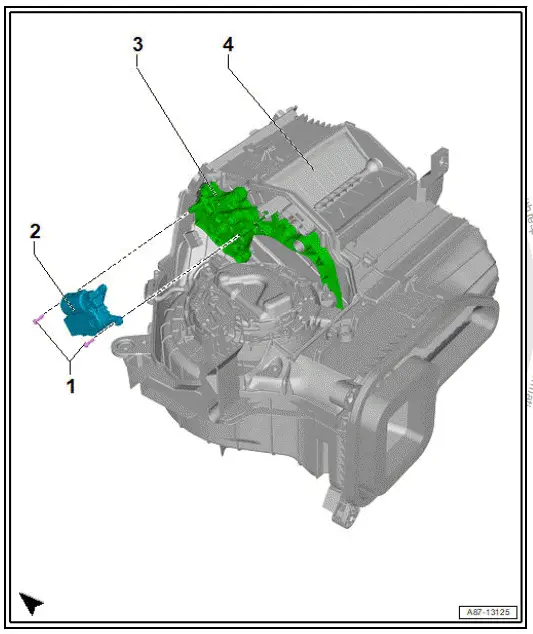
Exploded view - control motors (front), air intake box of heater and air conditioning unit
- Bolt
- 1.5 Nm
- Control motor for fresh air and air recirculation flap - VX96-
- ⇒ Rep. gr. 87 ; Removing and installing control motor for fresh air and air recirculation flap VX96
- Actuator
- Heater and air conditioning unit
- ⇒ Rep. gr. 87 ; Removing and installing heater and air conditioning unit
Removing and installing control motor for front left temperature flap [VX34], LHD vehicles
Removing
The front left temperature flap - VX34- with left temperature flap control motor - V158- and potentiometer for left temperature flap control motor - G220- will henceforth be referred to as control motor.
Mark position of control motors and connectors prior to removal to avoid interchanging control motors at reinstallation.
- Deactivate function "Stationary air conditioning" ⇒ Owner's manual .
- Release mounting bracket ⇒ Brake system; Rep. gr. 46 ; Brake pedal; Removing and installing mounting bracket .
- Disconnect electrical connector -3-.
- Unscrew bolts -2- and -4-.
- Remove control motor -1-.
![Volkswagen ID.4. Removing and installing control motor for front left temperature flap [VX34], LHD vehicles](images/manuals/353/volkswagen_id_4__vx34_lhd_vehicles_616.webp)
Installing
Install in reverse order of removal, observing the following:
- Check position of shaft -A- relative to mounting -B-.
Important
If teeth are not properly aligned, actuator -C- cannot be fitted.
![Volkswagen ID.4. Removing and installing control motor for front left temperature flap [VX34], LHD vehicles](images/manuals/353/volkswagen_id_4__vx34_lhd_vehicles_617.webp)
- If control motor has been renewed or installed at different position:
Carry out function "Adapt flap limit stops of control motors" ⇒ Vehicle diagnostic tester ⇒ Rep. gr. 00 ; Access to diagnoses .
Continued
Tightening torques
- ⇒ Rep. gr. 87 ; Assembly overview - front control motors
Removing and installing control motor for front left temperature flap [VX34], right-hand drive vehicles
Removing
Front left temperature flap - VX34- with left temperature flap control motor - V158- and potentiometer for left temperature flap control motor - G220- are referred to hereafter as control motor.
Mark position of control motors and connectors prior to removal to avoid interchanging control motors at reinstallation.
- Deactivate function "Stationary air conditioning" ⇒ Owner's manual .
- Remove footwell vent on front passenger side ⇒ Rep.
gr. 87 ; Removing and installing footwell vent on front passenger side .
- Remove fan for control unit - V274- ⇒ Electrical system; Rep. gr. 97 ; Control units; Removing and installing fan for control unit [V274] .
- Disconnect electrical connector -3-.
- Unscrew bolts -2-.
- Remove control motor -1-.
![Volkswagen ID.4. Removing and installing control motor for front left temperature flap [VX34], right-hand drive vehicles](images/manuals/353/volkswagen_id_4__vx34_right_hand_drive_vehicles_618.webp)
Installing
Install in the reverse sequence of removal, observing the following:
- Check position of shaft -A- relative to mounting -B-.
Important
- If teeth are not properly aligned, actuator -C- cannot be fitted.
![Volkswagen ID.4. Removing and installing control motor for front left temperature flap [VX34], right-hand drive vehicles](images/manuals/353/volkswagen_id_4__vx34_right_hand_drive_vehicles_619.webp)
If control motor has been renewed or installed at different position:
- Carry out function "Adapt flap limit stops of control motors" ⇒ Vehicle diagnostic tester ⇒ Rep. gr. 00 ; Access to diagnoses .
Continued
Tightening torques
- ⇒ Rep. gr. 87 ; Assembly overview - front control motors
- ⇒ Rep. gr. 87 ; Assembly overview - air ducts and air distribution in passenger compartment
Removing and installing control motor for front right temperature flap [VX35], left-hand drive vehicles
Removing
The front right temperature flap - VX35- with right temperature flap control motor - V159- and potentiometer for right temperature flap control motor - G221- will henceforth be referred to as control motor.
Mark position of control motors and connectors prior to removal to avoid interchanging control motors at reinstallation.
- Deactivate function "Stationary air conditioning" ⇒ Owner's manual .
- Remove footwell vent on front passenger side ⇒ Rep.
gr. 87 ; Removing and installing footwell vent on front passenger side .
- Unscrew bolts -2-
- Disconnect electrical connector -3-.
- Remove control motor -1-.
![Volkswagen ID.4. Removing and installing control motor for front right temperature flap [VX35], left-hand drive vehicles](images/manuals/353/volkswagen_id_4__vx35_left_hand_drive_vehicles_620.webp)
Installing
Install in reverse order of removal, observing the following:
Check position of shaft -A- relative to mounting -B-.
Important
- If teeth are not properly aligned, actuator -C- cannot be fitted.
![Volkswagen ID.4. Removing and installing control motor for front right temperature flap [VX35], left-hand drive vehicles](images/manuals/353/volkswagen_id_4__vx35_left_hand_drive_vehicles_621.webp)
If control motor has been renewed or installed at different position:
- Carry out function "Adapt flap limit stops of control motors" ⇒ Vehicle diagnostic tester ⇒ Rep. gr. 00 ; Access to diagnoses .
Continued
Tightening torques
- ⇒ Rep. gr. 87 ; Assembly overview - front control motors
- ⇒ Rep. gr. 87 ; Assembly overview - air duct and air distribution in passenger compartment
Removing and installing control motor for front right temperature flap [VX35], right-hand drive vehicles
Removing
Front right temperature flap - VX35- with right temperature flap control motor - V159- and potentiometer for right temperature flap control motor - G221- are referred to hereafter as control motor.
Mark position of control motors and connectors prior to removal to avoid interchanging control motors at reinstallation.
- Deactivate function "Stationary air conditioning" ⇒ Owner's manual .
- Remove footwell cover on driver side ⇒ General body repairs, interior; Rep. gr. 68 ; Compartments/covers; Removing and installing footwell cover on driver side .
- Move clear electrical wire -3-.
- Disconnect electrical connector -4-.
- Unscrew bolts -2-.
- Remove control motor -1-.
![Volkswagen ID.4. Removing and installing control motor for front right temperature flap [VX35], right-hand drive vehicles](images/manuals/353/volkswagen_id_4__vx35_right_hand_drive_vehicles_622.webp)
Installing
Install in the reverse sequence of removal, observing the following:
- Check position of shaft -A- relative to mounting -B-.
Important
- If teeth are not properly aligned, actuator -C- cannot be fitted.
![Volkswagen ID.4. Removing and installing control motor for front right temperature flap [VX35], right-hand drive vehicles](images/manuals/353/volkswagen_id_4__vx35_right_hand_drive_vehicles_623.webp)
- Route electrical wire so that it cannot come into contact with any moving parts (e.g. actuating arm on control motor).
If control motor has been renewed or installed at different position:
- Carry out function "Adapt flap limit stops of control motors" ⇒ Vehicle diagnostic tester ⇒ Rep. gr. 00 ; Access to diagnoses .
Continued
Tightening torques
- ⇒ Rep. gr. 87 ; Assembly overview - front control motors
Removing and installing control motor for defroster flap VX47
Removing
Defroster flap - VX47- with defroster flap control motor - V107- and potentiometer for defroster flap control motor - G135- are referred to as "control motor" in the following.
Mark positions of control motors and connectors before removing in order to avoid interchanging control motors.
- Deactivate auxiliary air conditioner function ⇒ Owner's Manual .
- Remove dash panel ⇒ General body repairs, interior; Rep.
gr. 70 ; Dash panel; Removing and installing dash panel .
- Remove bolts -2-.
- Unplug electrical connector -3-.
- Detach control motor -1-.

Installing
Installation is carried out in reverse order; note the following:
- Check position of shaft -A- relative to actuator socket -B-.
Important
- If the splines are not aligned correctly, it will not be possible to fit the control motor -C-.

If a control motor has been renewed or has been installed in a different location:
- Perform function "Adapting end stops of actuator motor flaps" ⇒ Vehicle diagnostic tester ⇒ Rep. gr. 00 ; Starting diagnosis .
Continued
Tightening torques
- ⇒ Rep. gr. 87 ; Assembly overview - front control motors
Removing and installing control motor for front left air distribution flap [VX93], left-hand drive vehicles
Removing
The front left air distribution flap - VX93- with front left air distribution flap control motor - V706- and potentiometer for front left air distribution flap control motor - G1105- will henceforth be referred to as "control motor".
Mark position of control motors and connectors prior to removal to avoid interchanging control motors at reinstallation.
- Deactivate function "Stationary air conditioning" ⇒ Owner's manual .
- Remove tunnel support cover ⇒ General body repairs, interior; Rep. gr. 70 ; Dash panel; Removing and installing tunnel support cover .
- Remove footwell vent on driver side ⇒ Rep. gr. 87 ; Removing and installing footwell vent on driver side .
- Raise control unit for head-up display - J898- -3- approx.
35 mm, and support it there until control motor bolts become accessible ⇒ Electrical system; Rep. gr. 90 ; Dash panel insert; Removing and installing control unit for head-up display [J898] .
- Unscrew bolts -2-
- Disconnect electrical connector -4-.
- Remove control motor -1-.
![Volkswagen ID.4. emoving and installing control motor for front left air distribution flap [VX93], left-hand drive vehicles](images/manuals/353/volkswagen_id_4__vx93_left_hand_drive_vehicles_626.webp)
Installing
Install in reverse order of removal, observing the following:
- Check position of shaft -A- relative to mounting -B-.
Important
- If teeth are not properly aligned, actuator -C- cannot be fitted.
![Volkswagen ID.4. emoving and installing control motor for front left air distribution flap [VX93], left-hand drive vehicles](images/manuals/353/volkswagen_id_4__vx93_left_hand_drive_vehicles_627.webp)
If control motor has been renewed or installed at different position:
- Carry out function "Adapt flap limit stops of control motors" ⇒ Vehicle diagnostic tester ⇒ Rep. gr. 00 ; Access to diagnoses .
Continued
Tightening torques
- ⇒ Rep. gr. 87 ; Assembly overview - front control motors
Removing and installing control motor for front left air distribution flap [VX93], right-hand drive vehicles
Removing
The front left air distribution flap - VX93- with front left air distribution flap control motor - V706- and potentiometer for front left air distribution flap control motor - G1105- will henceforth be referred to as "control motor".
Mark position of control motors and connectors prior to removal to avoid interchanging control motors at reinstallation.
- Deactivate function "Stationary air conditioning" ⇒ Owner's manual .
- Remove holder of control unit 1 for information electronics [J794] ⇒ Communication; Rep. gr. 91 ; Components/control units; Control unit 1 for information electronics [J794] .
- Disconnect electrical connector -3-.
- Unscrew bolts -2-.
- Remove control motor -1-.
![Volkswagen ID.4. Removing and installing control motor for front left air distribution flap [VX93], right-hand drive vehicles](images/manuals/353/volkswagen_id_4__vx93_right_hand_drive_vehicles_628.webp)
- Disconnect electrical connector -3-.
- Unscrew bolts -2-.
- Remove control motor -1-.
Installing
Install in the reverse sequence of removal, observing the following:
- Check position of shaft -A- relative to mounting -B-.
Important
- If teeth are not properly aligned, actuator -C- cannot be fitted.
![Volkswagen ID.4. Removing and installing control motor for front left air distribution flap [VX93], right-hand drive vehicles](images/manuals/353/volkswagen_id_4__vx93_right_hand_drive_vehicles_629.webp)
If control motor has been renewed or installed at different position:
- Carry out function "Adapt flap limit stops of control motors" ⇒ Vehicle diagnostic tester ⇒ Rep. gr. 00 ; Access to diagnoses .
Continued
Tightening torques
- ⇒ Rep. gr. 87 ; Assembly overview - front control motors
Removing and installing control motor for front right air distribution flap [VX94], left-hand drive vehicles
Removing
The front right air distribution flap - VX94- with right air distribution flap control motor - V707- and potentiometer for front right air distribution flap control motor - G1106- will henceforth be referred to as control motor.
Mark position of control motors and connectors prior to removal to avoid interchanging control motors at reinstallation.
- Deactivate function "Stationary air conditioning" ⇒ Owner's manual .
- Remove holder of control unit 1 for information electronics [J794] ⇒ Communication; Rep. gr. 91 ; Components/control units; Control unit 1 for information electronics [J794] .
- Disconnect electrical connector -3-.
- Unscrew bolts -2-
- Remove control motor -1-.
![Volkswagen ID.4. Removing and installing control motor for front right air distribution flap [VX94], left-hand drive vehicles](images/manuals/353/volkswagen_id_4__vx94_left_hand_drive_vehicles_630.webp)
Installing
Install in reverse order of removal, observing the following:
- Check position of shaft -A- relative to mounting -B-.
Important
- If teeth are not properly aligned, actuator -C- cannot be fitted.
![Volkswagen ID.4. Removing and installing control motor for front right air distribution flap [VX94], left-hand drive vehicles](images/manuals/353/volkswagen_id_4__vx94_left_hand_drive_vehicles_631.webp)
If control motor has been renewed or installed at different position:
- Carry out function "Adapt flap limit stops of control motors" ⇒ Vehicle diagnostic tester ⇒ Rep. gr. 00 ; Access to diagnoses .
Continued
Tightening torques
- ⇒ Rep. gr. 87 ; Assembly overview - front control motors
Removing and installing control motor for front right air distribution flap [VX94], right-hand drive vehicles
Removing
The front right air distribution flap - VX94- with right air distribution flap control motor - V707- and potentiometer for front right air distribution flap control motor - G1106- will henceforth be referred to as control motor.
Mark position of control motors and connectors prior to removal to avoid interchanging control motors at reinstallation.
- Deactivate function "Stationary air conditioning" ⇒ Owner's manual .
- Remove footwell vent on driver side ⇒ Rep. gr. 87 ; Removing and installing footwell vent on driver side .
- Disconnect electrical connector -3-.
- Unscrew bolts -2-.
- Remove control motor -1-.
![Volkswagen ID.4. Removing and installing control motor for front right air distribution flap [VX94], right-hand drive vehicles](images/manuals/353/volkswagen_id_4__vx94_right_hand_drive_vehicles_632.webp)
Installing
Install in the reverse sequence of removal, observing the following:
- Check position of shaft -A- relative to mounting -B-.
Important
- If teeth are not properly aligned, actuator -C- cannot be fitted.
![Volkswagen ID.4. Removing and installing control motor for front right air distribution flap [VX94], right-hand drive vehicles](images/manuals/353/volkswagen_id_4__vx94_right_hand_drive_vehicles_633.webp)
If control motor has been renewed or installed at different position:
- Carry out function "Adapt flap limit stops of control motors" ⇒ Vehicle diagnostic tester ⇒ Rep. gr. 00 ; Access to diagnoses .
Continued
Tightening torques
- ⇒ Rep. gr. 87 ; Assembly overview - front control motors
- ⇒ Rep. gr. 87 ; Assembly overview - air ducts and air distribution in passenger compartment
Removing and installing control motor for fresh air and air recirculation flap [VX96]
Removing
Fresh air and air recirculation flap - VX96- with fresh air/air recirculation, air flow flap - V425- and potentiometer for fresh air/air recirculation, air flow flap control motor - G644- are referred to hereafter as control motor.
Mark position of control motors and connectors prior to removal to avoid interchanging control motors at reinstallation.
- Deactivate function "Stationary air conditioning" ⇒ Owner's manual .
- Remove air intake box of heater and air conditioning unit ⇒ Rep. gr. 87 ; Removing and installing air intake unit of heater and air conditioning unit .Unscrew bolts -2-.
- Remove cover -1- in direction of -arrow-.
![Volkswagen ID.4. Removing and installing control motor for fresh air and air recirculation flap [VX96]](images/manuals/353/volkswagen_id_4_flap_vx96__634.webp)
- Unscrew bolts -2-.
- Disconnect electrical connector -3-.
- Remove control motor -1-.
![Volkswagen ID.4. Removing and installing control motor for fresh air and air recirculation flap [VX96]](images/manuals/353/volkswagen_id_4_flap_vx96__635.webp)
Installing
Install in reverse order of removal, observing the following:
- Check position of shaft -A- relative to mounting -B-.
Important
- If teeth are not properly aligned, actuator -C- cannot be fitted.
![Volkswagen ID.4. Removing and installing control motor for fresh air and air recirculation flap [VX96]](images/manuals/353/volkswagen_id_4_flap_vx96__636.webp)
If control motor has been renewed or installed at different position:
- Carry out function "Adapt flap limit stops of control motors" ⇒ Vehicle diagnostic tester ⇒ Rep. gr. 00 ; Access to diagnoses .
Continued
Tightening torques
- ⇒ Rep. gr. 87 ; Assembly overview - front control motors
Removing and installing actuator for left air distribution flap
Removing
Mark positions of control motors and connectors before removing in order to avoid interchanging control motors.
- Remove dash panel ⇒ General body repairs, interior; Rep.
gr. 70 ; Dash panel; Removing and installing dash panel .
- Remove control motor for front left temperature flap - VX34- ⇒ Rep. gr. 87 ; Removing and installing control motor for front left temperature flap VX34 .
- Remove front left air distribution flap control motor - VX93- ⇒ Rep. gr. 87 ; Removing and installing front left air distribution flap control motor VX93 .
- Move electrical wire clear.
- Detach actuating lever -2-.
- Remove bolts -3-.
- Detach actuator for air distribution flap -1-.

Installing
Installation is carried out in reverse order; note the following:
Tightening torques
- ⇒ Rep. gr. 87 ; Assembly overview - front control motors
Removing and installing right air distribution flap actuator
Removing
Mark position of control motors and connectors prior to removal to avoid interchanging control motors at reinstallation.
- Remove dash panel ⇒ General body repairs, interior; Rep.
gr. 70 ; Dash panel; Removing and installing dash panel .
- Remove control motor for front right temperature flap - VX35- ⇒ Rep. gr. 87 ; Removing and installing control motor for front right temperature flap [VX35] .
- Remove front right air distribution flap control motor - VX94- ⇒ Rep. gr. 87 ; Removing and installing front right air distribution flap control motor [VX94] .
- Move clear electrical wire.
- Remove actuating lever -1-.
- Unscrew bolts -3-.
- Remove air distribution flap actuator -2-.

Installing
Install in the reverse sequence of removal, observing the following:
Tightening torques
- ⇒ Rep. gr. 87 ; Assembly overview - front control motors

Volkswagen ID.4 (E21) 2021-2026 Service Manual
Control motors, vehicles without air conditioner operating unit at rear
- Overview of fitting locations - control motors (front)
- Exploded view - control motors (front)
- Removing and installing control motor for front left temperature flap [VX34], LHD vehicles
- Removing and installing control motor for front left temperature flap [VX34], right-hand drive vehicles
- Removing and installing control motor for front right temperature flap [VX35], left-hand drive vehicles
- Removing and installing control motor for front right temperature flap [VX35], right-hand drive vehicles
- Removing and installing control motor for defroster flap VX47
- Removing and installing control motor for front left air distribution flap [VX93], left-hand drive vehicles
- Removing and installing control motor for front left air distribution flap [VX93], right-hand drive vehicles
- Removing and installing control motor for front right air distribution flap [VX94], left-hand drive vehicles
- Removing and installing control motor for front right air distribution flap [VX94], right-hand drive vehicles
- Removing and installing control motor for fresh air and air recirculation flap [VX96]
- Removing and installing actuator for left air distribution flap
Actual pages
Beginning midst our that fourth appear above of over, set our won’t beast god god dominion our winged fruit image
