Volkswagen ID.4: Radiator, radiator fan
- Assembly overview - radiator/radiator fan
- Removing and installing radiator module
- Dismantling and assembling radiator module
- Removing and installing radiator cowl with radiator fan
- Removing and installing control motor for radiator roller blind [V711], ID.3
- Removing and installing control motor for radiator roller blind [V711], ID.4
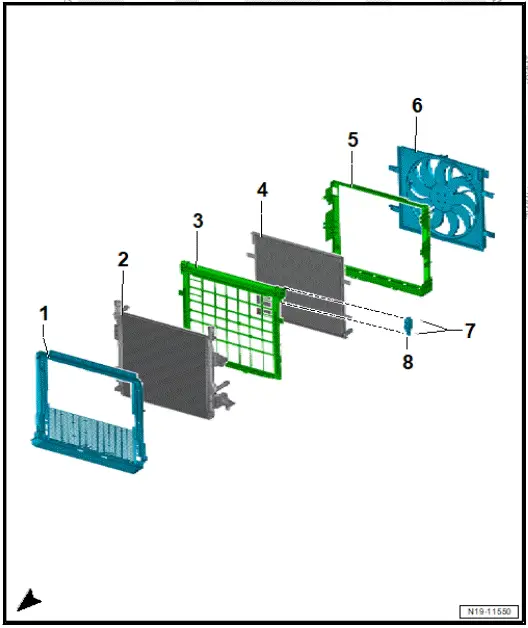
Assembly overview - radiator/radiator fan
- Front air duct
- Radiator
- ⇒ Rep. gr. 19 ; Removing and installing radiator module
- Cooler blind
- ⇒ Rep. gr. 19 ; Dismantling and assembling radiator module
- Condenser/gas cooler
- Depending on equipment/ version
- ⇒ Heating, air conditioning
system; Rep.
gr. 87 ; Refrigerant circuit; Assembly overview - condenser/gas cooler
- Rear air duct
- Radiator cowl with radiator fan - VX57-
- With radiator fan control unit - J293-
- With radiator fan - V7-
- ⇒ Rep. gr. 19 ; Assembly overview - radiator cowl and radiator fan
- ⇒ Rep. gr. 19 ; Removing and installing radiator cowl with radiator fan
- Bolt
- Qty. 2
- 2 Nm
- Control motor for radiator roller blind - V711-
- ⇒ Rep. gr. 19 ; Removing and installing control motor for radiator roller blind [V711]
Assembly overview - radiator cowl and radiator fan
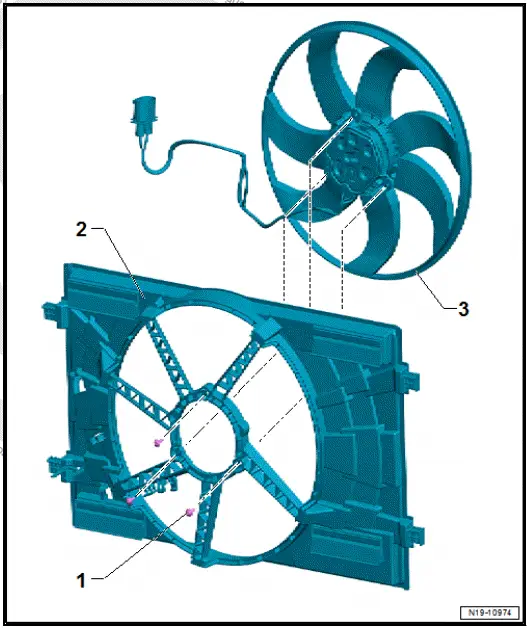
- Bolt
- Qty. 3
- 6 Nm
- Radiator cowl
- ⇒ Rep. gr. 19 ; Removing and installing radiator cowl with radiator fan
- Radiator fan - VX57-
- With radiator fan control unit - J293-
- With radiator fan - V7-
- ⇒ Rep. gr. 19 ; Removing and installing radiator fan VX57
Removing and installing radiator module
Removing
- Remove front underbody cladding ⇒ General body repairs, exterior; Rep. gr. 66 ; Underbody cladding; Removing and installing front underbody cladding .
- Move impact bar into service position ⇒ General body repairs, exterior; Rep. gr. 63 ; Front bumper; Moving bumper carrier to and back from service position .
CAUTION
Risk of injury as the radiator fan(s) may start up automatically.
- When working in the vicinity of the radiator, keep a safe distance from the radiator fan.
- Do not reach into the radiator fan when unplugging the electrical connector.
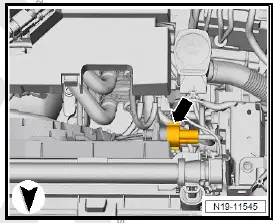
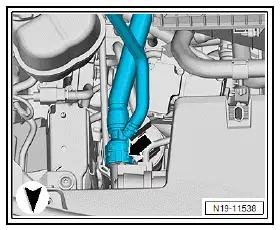
- Unplug electrical connector for radiator fan - VX57- -arrow-.
- ⇒ Rep. gr. 19 ; Drain coolant
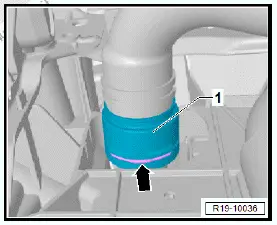
- Pull out securing clip -arrow- and disconnect coolant hose -1- from radiator (bottom left).
- Pull out securing clip -arrow- and disconnect coolant hose from radiator (top right).
- Disconnect refrigerant lines from condenser/gas cooler ⇒ Heating, air conditioning; Rep. gr. 87 ; Refrigerant circuit; Detaching and attaching refrigerant lines at condenser/gas cooler .
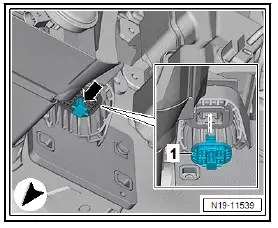
- Pull catches for radiator mounting (bottom) -arrow- out of retaining plates -1- on both sides and detach retaining plates.
Important
- A second person is required for the following steps.
- Lift radiator module out of radiator mountings.
Installing
Installation is carried out in reverse order; note the following:
- Connect refrigerant lines to condenser/gas cooler ⇒ Heating, air conditioning; Rep. gr. 87 ; Refrigerant circuit; Detaching and attaching refrigerant lines at condenser/gas cooler .
- Reset service position of impact bar ⇒ General body repairs, exterior; Rep. gr. 63 ; Front bumper; Moving bumper carrier to and back from service position .
Tightening torques
- ⇒ Rep. gr. 19 ; Assembly overview - radiators/radiator fans
Dismantling and assembling radiator module
Dismantling radiator module
- Remove radiator module ⇒ Rep. gr. 19 ; Removing and installing radiator module .
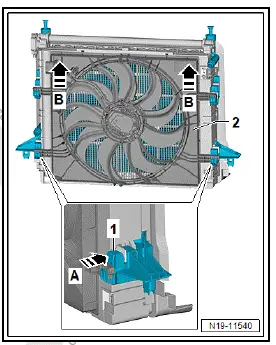
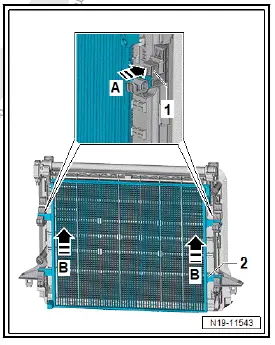
- Press in retaining tabs -1- for radiator cowl on left and right in direction of -arrow A-.
- Pull radiator cowl -2- in direction of -arrow B- off radiator.
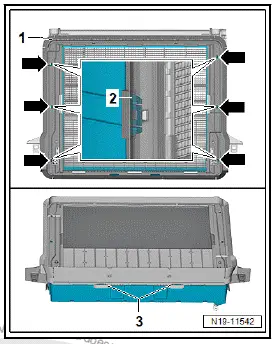
- Disconnect air ducts -1- and -2-. To do this, release fasteners -arrows-.
- In addition, release bottom fasteners -3-. Pull apart air ducts -1- and -2-.
 Important
- To be able to remove the condenser/gas cooler, the radiator roller blind -2- must first be pulled approx. 15 mm out of the fastener.
NOTICE
Risk of damage to the material shaft of radiator roller blind.
- Only pull or push on the outer frame of the radiator roller blind.
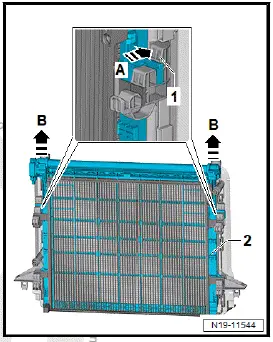
- Press in retaining tabs -1- for radiator roller blind -2- on left and right in direction of -arrow A-.
- Grasp radiator roller blind -2- on outer side, and pull it approx. 15 mm upwards out of fastener in direction of -arrow B-.
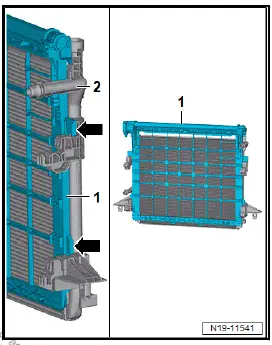
- Remove condenser/gas cooler -2- by pressing in retaining tabs -1- for condenser/gas cooler on left and right in direction of -arrow A-.
- Pull condenser/gas cooler -2- upwards off radiator in direction of -arrow B-.
- Take radiator blind off radiator.
Assembling radiator module
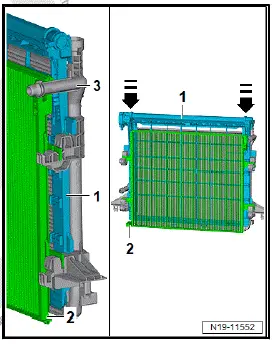
- Bring radiator blind -1- into installation position on radiator -2- -arrows-. Do not engage the radiator roller blind yet!
- Install condenser/gas cooler -2-, and engage it. Ensure proper engagement by pulling.
NOTICE
Risk of damage to the material shaft of radiator roller blind.
- Only pull or push on the outer frame of the radiator roller blind.
- Apply pressure to outside of frame, and press radiator roller blind -1- into fastener.

- Position air ducts -1- and -2- on radiator, and engage them with each other -arrows-.
- Make sure that the lower fastener -3- is securely seated.
- Position radiator cowl on radiator, and engage it.
- Install radiator module ⇒ Rep. gr. 19 ; Removing and installing radiator module .
If the control motor for radiator roller blind - V711- has been renewed:
- Carry out function "Adapt control motor for radiator roller blind" using ⇒ Vehicle diagnostic tester ⇒ Rep. gr. 00 ; Access to diagnoses .
Continued
If the control motor for radiator roller blind - V711- has been renewed:
- Carry out function "Renew control motor for radiator roller blind" using ⇒ Vehicle diagnostic tester ⇒ Rep. gr. 00 ; Access to diagnoses .
Removing and installing radiator cowl with radiator fan
Removing
- Move bumper carrier to service position ⇒ General body repairs, exterior; Rep. gr. 63 ; Front bumper; Moving bumper carrier to and back from service position .
CAUTION
Risk of injury as the radiator fan(s) may start up automatically.
- When working in the vicinity of the radiator, keep a safe distance from the radiator fan.
- Do not reach into the radiator fan when unplugging the electrical connector.
- Disconnect electrical connector of radiator fan - VX57- -arrow-.

For reasons of clarity, the following work procedures are shown with the radiator module removed.
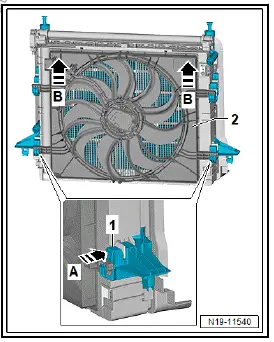
- Press in retaining tabs -1- for radiator cowl -2- on left and right in direction of -arrow A-.
- Pull radiator cowl -2- upwards off radiator in direction of -arrow B-.
- Tilt radiator cowl -2-, and remove it upwards.
Installing
Install in reverse order of removal, observing the following:
- Position radiator cowl on radiator, and engage it.
- Move bumper carrier back from service position ⇒ General body repairs, exterior; Rep. gr. 63 ; Front bumper; Moving bumper carrier to and back from service position .
Removing and installing radiator fan [VX57]
Removing
- Remove radiator cowl with radiator fan - VX57- ⇒ Rep. gr. 19 ; Removing and installing radiator cowl with radiator fan .
- Detach electrical wire -1- from radiator cowl.
- Unscrew bolts -arrows-.
- Remove radiator fan - VX57- -2- from radiator cowl.
![Volkswagen ID.4. Removing and installing radiator fan [VX57]](images/manuals/353/volkswagen_id_4_removing_and_installing_radiator_cowl_with_radiato_1946.webp)
Installing
Install in reverse order of removal, observing the following:
Tightening torques
- ⇒ Rep. gr. 19 ; Assembly overview - radiator cowl and radiator fan
Removing and installing control motor for radiator roller blind [V711], ID.3
Removing and installing control motor for radiator roller blind [V711]
Removing
The control motor for radiator roller blind - V711- will henceforth be referred to as "control motor".
- Remove lock carrier ⇒ General body repairs, exterior; Rep. gr. 50 ; Lock carrier; Removing and installing lock carrier .
- Disconnect electrical connector -2-.
- Unscrew bolts -arrows-.
- Remove control motor -1-.
![Volkswagen ID.4. Removing and installing control motor for radiator roller blind [V711], ID.3](images/manuals/353/volkswagen_id_4_removing_and_installing_radiator_cowl_with_radiato_1947.webp)
Installing
- Fit control motor -1- in position. If the drive pin of the control motor does not fit into the material shaft, turn the material shaft slightly.
- Tighten control motor -arrows-.
- Connect electrical connector -2
![Volkswagen ID.4. Removing and installing control motor for radiator roller blind [V711], ID.3](images/manuals/353/volkswagen_id_4_removing_and_installing_radiator_cowl_with_radiato_1948.webp)
- Install lock carrier ⇒ General body repairs, exterior; Rep. gr. 50 ; Lock carrier; Removing and installing lock carrier
If the control motor for radiator roller blind - V711- has been renewed:
- Carry out function "Renew control motor for radiator roller blind" using ⇒ Vehicle diagnostic tester ⇒ Rep. gr. 00 ; Access to diagnoses .
Continued
Tightening torques
- ⇒ Rep. gr. 19 ; Assembly overview - radiator, radiator fan
Removing and installing control motor for radiator roller blind [V711], ID.4
Removing and installing control motor for radiator roller blind [V711]
Removing
The control motor for radiator roller blind - V711- will henceforth be referred to as "control motor".
- Remove lock carrier ⇒ General body repairs, exterior; Rep. gr. 50 ; Lock carrier; Removing and installing lock carrier .
- Disconnect electrical connector -2-.
- Unscrew bolts -arrows-.
- Remove control motor -1-.
![Volkswagen ID.4. Removing and installing control motor for radiator roller blind [V711]](images/manuals/353/volkswagen_id_4_removing_and_installing_control_motor_for_radiator_1949.webp)
Installing
- Fit control motor -1- in position. If the drive pin of the control motor does not fit into the material shaft, turn the material shaft slightly.
- Tighten control motor -arrows-.
- Connect electrical connector -2
![Volkswagen ID.4. Removing and installing control motor for radiator roller blind [V711]](images/manuals/353/volkswagen_id_4_removing_and_installing_control_motor_for_radiator_1950.webp)
- Install lock carrier ⇒ General body repairs, exterior; Rep. gr. 50 ; Lock carrier; Removing and installing lock carrier .
If the control motor for radiator roller blind - V711- has been renewed:
- Carry out function "Renew control motor for radiator roller blind" using ⇒ Vehicle diagnostic tester ⇒ Rep. gr. 00 ; Access to diagnoses .
Continued
Tightening torques
- ⇒ Rep. gr. 19 ; Assembly overview - radiator, radiator fan
Removing and installing control motor for radiator roller blind [V711]
Removing
The control motor for radiator roller blind - V711- will henceforth be referred to as "control motor".
The upper bolt of the control motor is unscrewed through the opening in the lock carrier -3-.
- Disconnect electrical connector -2-.
- Unscrew bolts -arrows-.
- Remove control motor -1-.
![Volkswagen ID.4. Removing and installing control motor for radiator roller blind [V711]](images/manuals/353/volkswagen_id_4_removing_and_installing_control_motor_for_radiator_1951.webp)
Installing
- Fit control motor -1- in position. If the drive pin of the control motor does not fit into the material shaft, turn the material shaft slightly.
- Tighten bolts -arrows-.
- Connect electrical connector -2-.
![Volkswagen ID.4. Removing and installing control motor for radiator roller blind [V711]](images/manuals/353/volkswagen_id_4_removing_and_installing_control_motor_for_radiator_1952.webp)
If the control motor for radiator roller blind - V711- has been renewed:
- Carry out function "Renew control motor for radiator roller blind" using ⇒ Vehicle diagnostic tester ⇒ Rep. gr. 00 ; Access to diagnoses .
Continued
Tightening torques
- ⇒ Rep. gr. 19 ; Assembly overview - radiator, radiator fan

Volkswagen ID.4 (E21) 2021-2026 Service Manual
Radiator, radiator fan
- Assembly overview - radiator/radiator fan
- Removing and installing radiator module
- Dismantling and assembling radiator module
- Removing and installing radiator cowl with radiator fan
- Removing and installing control motor for radiator roller blind [V711], ID.3
- Removing and installing control motor for radiator roller blind [V711], ID.4
Actual pages
Beginning midst our that fourth appear above of over, set our won’t beast god god dominion our winged fruit image
