Volkswagen ID.4: Central locking
- Overview of fitting locations - central locking system
- Removing and installing door control unit [J386]/[J387]
- Removing and installing rear door control unit [J926]/[J927]
Overview of fitting locations - central locking system
Overview shows a left-hand drive vehicle as an example
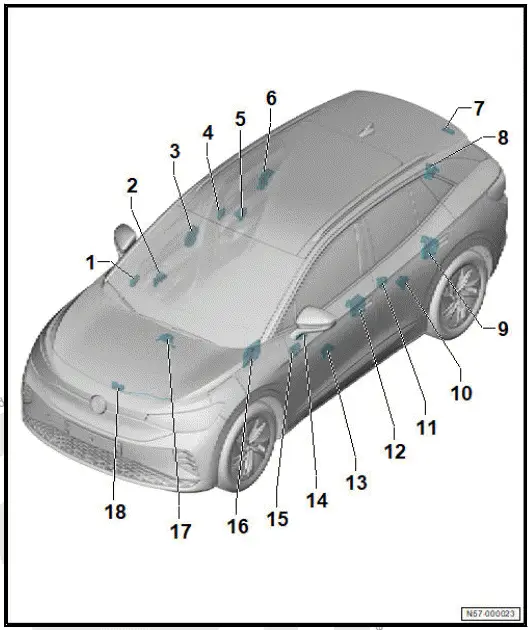
- Front passenger door control unit - J387-
- ⇒ Rep. gr. 57 ; Removing and installing door control unit [J386]/ [J387]
- Front passenger side window regulator motor - V148-
- ⇒ Rep. gr. 57 ; Assembly overview - assembly carrier
- ⇒ Rep. gr. 57 ; Removing and installing window regulator motor [V147]/[V148]
- Front passenger door lock unit - VX22-
- With front passenger door contact switch - F3-
- With front passenger side central locking lock unit - F221-
- With front passenger door central locking actuator for SAFELOCK function - F244-
- With front passenger door central locking motor - V57-
- With front passenger door central locking SAFELOCK function motor - V162-
- ⇒ Rep. gr. 57 ; Assembly overview - door handle and door lock
- ⇒ Rep. gr. 57 ; Removing and installing lock unit [VX21]/[VX22]
- Rear passenger side door control unit - J927-
- ⇒ Rep. gr. 57 ; Removing and installing rear door control unit [J926]/[J927]
- Rear passenger side window regulator motor - V472-
- ⇒ Rep. gr. 58 ; Assembly overview - assembly carrier
- ⇒ Rep. gr. 58 ; Removing and installing rear window regulator motor [V471]/[V472]
- Rear door lock unit, passenger side - VX84-
- With rear door contact switch, passenger side - F506-
- With rear passenger side central locking lock unit - F436-
- With rear central locking actuator, passenger side - F510-
- With rear central locking motor, passenger side - V540-
- With rear central locking SAFELOCK function motor, passenger side - V538-
- ⇒ Rep. gr. 58 ; Assembly overview - door handle and door lock
- ⇒ Rep. gr. 58 ; Removing and installing rear door lock unit [VX83]/[VX84]
- Rear lid handle
- With rear lid handle release button - E234-
- Depending on equipment/version, with reversing camera - R189- or rear overhead view camera - R246-
- Rep. gr. 55 ; Assembly overview - rear lid
- ⇒ Rep. gr. 55 ; Removing and installing rear lid handle
- Rear lid lock unit - VX25-
- ⇒ Rep. gr. 55 ; Assembly overview - rear lid
- ⇒ Rep. gr. 55 ; Assembly overview - electrically operated rear lid
- Rear door lock unit, driver side - VX83-
- With rear door contact switch, driver side - F505-
- With rear driver side central locking lock unit - F435-
- With rear central locking actuator, driver side - F509-
- With rear central locking motor, driver side - V539-
- With rear central locking SAFELOCK function motor, driver side - V537-
- ⇒ Rep. gr. 58 ; Assembly overview - door handle and door lock
- ⇒ Rep. gr. 58 ; Removing and installing rear door lock unit [VX83]/[VX84]
- Rear driver side window regulator motor - V471-
- ⇒ Rep. gr. 58 ; Assembly overview - assembly carrier
- ⇒ Rep. gr. 58 ; Removing and installing rear window regulator motor [V471]/[V472]
- Rear driver side door control unit - J926-
- ⇒ Rep. gr. 57 ; Removing and installing rear door control unit [J926]/[J927]
- Driver door lock unit - VX21-
- With driver door contact switch - F2-
- With driver side central locking lock unit - F220-
- With driver side contact switch in lock cylinder - F241-
- With driver door central locking actuator for SAFELOCK function - F243-
- With driver door central locking motor - V56-
- With driver door central locking SAFELOCK function motor - V161- ⇒ Rep. gr. 58 ; Assembly overview - door handle and door lock
- ⇒ Rep. gr. 57 ; Removing and installing lock unit [VX21]/[VX22]
- Driver side window regulator motor - V147-
- ⇒ Rep. gr. 57 ; Assembly overview - assembly carrier
- ⇒ Rep. gr. 57 ; Removing and installing window regulator motor [V147]/[V148]
- Operating unit for window regulator in driver door - EX36-
- ⇒ Electrical system; Rep. gr. 96 ; Controls; Overview of fitting locations - controls in front doors
- ⇒ Electrical system; Rep. gr. 96 ; Controls; Removing and installing operating unit for window regulator in driver door [EX36]
- Driver door control unit - J386-
- ⇒ Rep. gr. 57 ; Removing and installing door control unit [J386]/[J387]
- Onboard supply control unit - J519-
- ⇒ Electrical system; Rep. gr. 97 ; Control units; Assembly overview - onboard supply control unit
- ⇒ Electrical system; Rep. gr. 97 ; Control units; Removing and installing onboard supply control unit [J519]
- Alarm horn - H12-
- ⇒ Electrical system; Rep. gr. 96 ; Anti-theft alarm system; Assembly overview - interior monitoring
- ⇒ Electrical system; Rep. gr. 96 ; Anti-theft alarm system; Removing and installing alarm horn [H12]
- Bonnet lock
- With bonnet contact switch - F266-
- ⇒ Rep. gr. 55 ; Assembly overview - bonnet
- ⇒ Rep. gr. 55 ; Removing and installing bonnet lock
Removing and installing door control unit [J386]/[J387]
The driver door control unit - J386- and front passenger door control unit - J387- will henceforth be referred to as "door control unit".
Removal and installation are described for the left side of vehicle as an example.
Removing
If the door control unit is renewed, perform the test plan for the renewal of the control unit:
- Carry out function "Renew control unit" using ⇒ Vehicle diagnostic tester ⇒ Rep. gr. 00 ; Access to diagnoses .
Continued
- Remove front door trim ⇒ General body repairs interior; Rep. gr. 70 ; Front door trims; Removing and installing front door trim .
- Disconnect electrical connectors -2-.
- Disengage hook -3- in direction of -arrow A-.
- Push door control unit -1- in direction of -arrow B-, and remove it.
![Volkswagen ID.4. Removing and installing door control unit [J386]/[J387]](images/manuals/353/volkswagen_id_4_removing_and_installing_door_control_unit_j386__1137.webp)
Installing
Install in reverse order of removal, observing the following:
If the control unit has been renewed, conclude the test plan for the renewal of the control unit:
- Carry out function "Renew control unit" using ⇒ Vehicle diagnostic tester ⇒ Rep. gr. 00 ; Access to diagnoses .
Removing and installing rear door control unit [J926]/[J927]
The rear driver side door control unit - J926- and rear passenger side door control unit - J927- will henceforth be referred to as "door control unit".
Removal and installation are described for the left side of vehicle as an example.
Removing
- Carry out function "Renew control unit" using ⇒ Vehicle diagnostic tester ⇒ Rep. gr. 00 ; Access to diagnoses .
- Remove rear door trim ⇒ General body repairs; interior; Rep. gr. 70 ; Rear door trims; Removing and installing rear door trim .
- Disconnect electrical connectors -2-.
- Disengage hook -3- in direction of -arrow A-.
- Push door control unit -1- in direction of -arrow B-, and remove it.
![Volkswagen ID.4. Removing and installing rear door control unit [J926]/[J927]](images/manuals/353/volkswagen_id_4_removing_and_installing_rear_door_control_unit_j9_1138.webp)
Installing
Install in reverse order of removal, observing the following:
- Carry out function "Renew control unit" using ⇒ Vehicle diagnostic tester ⇒ Rep. gr. 00 ; Access to diagnoses .
Removing and installing ignition key battery
See the ⇒ owner's manual for information about removal and installation of the battery in the ignition key.
Removing and installing actuator for high-voltage charging flap lock [F496]
Removing
- Remove charging flap unit ⇒ Rep. gr. 55 ; Removing and installing charging flap unit .
- Unscrew bolts -2-.
- Remove actuator for high-voltage charging flap lock 1 - F496- -1- from charging flap unit.
![Volkswagen ID.4. Removing and installing actuator for high-voltage charging flap lock [F496]](images/manuals/353/volkswagen_id_4_removing_and_installing_rear_door_control_unit_j9_1139.webp)
Installing
Install in reverse order of removal, observing the following:
Tightening torques
- ⇒ Rep. gr. 55 ; Assembly overview - charging flap unit

Volkswagen ID.4 (E21) 2021-2026 Service Manual
Central locking
- Overview of fitting locations - central locking system
- Removing and installing door control unit [J386]/[J387]
- Removing and installing rear door control unit [J926]/[J927]
Actual pages
Beginning midst our that fourth appear above of over, set our won’t beast god god dominion our winged fruit image
