Volkswagen ID.4: Controls
- Overview of fitting locations - controls in dash panel
- Overview of fitting locations - controls in front doors
- Overview of fitting locations - controls in rear doors
- Overview of fitting locations - controls in luggage compartment
- Overview of fitting locations - controls in roof trim
- Removing and installing operating unit for lighting [EX59]
- Removing and installing operating unit for window regulator in driver door [EX36]
- Removing and installing rear lid remote release button [E233]
- Removing and installing towing bracket release button [E754]
- Removing and installing front roof module [WX3]
- Removing and installing rear interior light/reading light
Overview of fitting locations - controls in dash panel
Overview shows left-hand drive vehicle as an example

- Operating unit for lighting - EX59-
- With light switch - E1-
- With switch and instrument illumination regulator - E20- , rear fog light button - E314- , heated rear window button - E230- , button for automatic lighting control - E854- , button for side lights - E855- , button for dipped beam headlights - E856- , defroster button - E782-
- With rear fog light warning lamp - K13- , heated rear window warning lamp - K10-
- ⇒ Rep. gr. 96 ; Removing and installing operating unit for lighting [EX59]
- Electromechanical parking brake button - E538-
- Depending on equipment/ version
- With electromechanical parking brake warning lamp - K213-
- In steering column electronics control unit - J527-
- ⇒ Rep. gr. 94 ; Removing and installing steering column electronics control unit [J527]
- Key-operated switch to deactivate airbag on front passenger side - E224-
- ⇒ General body repairs, interior; Rep. gr. 69 ; Front passenger airbag; Removing and installing key-operated switch to deactivate airbag on front passenger side
- Centre switch module in dash panel - EX22-
- With operating unit 1 for driver and convenience functions - E791-
- With hazard warning lights button - E229-
- With button for driver assist systems - E617-
- With driving mode selection button - E735-
- With air conditioning system and heating button - E85-
- ⇒ Rep. gr. 96 ; Removing and installing centre switch module in dash panel [EX22]
- Starter button - E378-
- ⇒ Rep. gr. 96 ; Removing and installing starter button [E378]
Overview of fitting locations - controls in front doors
The overview shows a left-hand drive vehicle as an example.
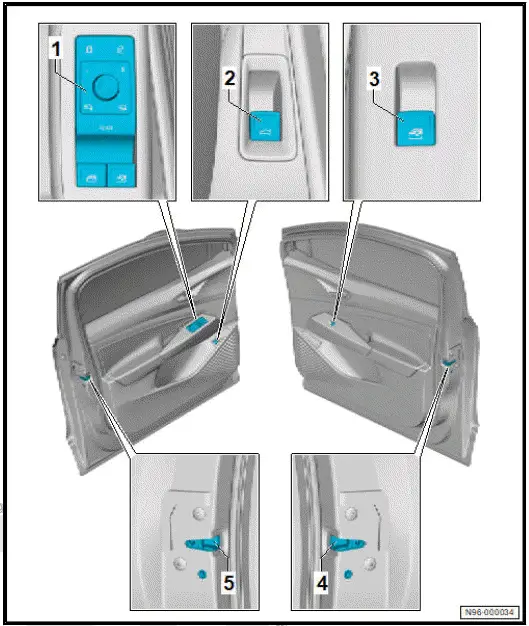
- Operating unit for window regulator in driver door - EX36-
- With childproof lock button - E318- , operating unit for window regulator in driver door - E512- , front driver side window regulator button - E710- , rear driver side window regulator button, in driver door - E712- , rear passenger side window regulator button, in driver door - E714- , front driver side window regulator button, in the driver door - E715- ❑ With driver side interior locking button for central locking system - E308- , mirror adjustment switch - E43- , rear window regulator isolation switch - E39- , mirror adjustment changeover switch - E48-
- With rear window regulator lock warning lamp - K194- , driver side interior locking warning lamp - K174-
- ⇒ Rep. gr. 96 ; Removing and installing operating unit for window regulator in driver door [EX36]
- Rear lid remote release button - E233-
- Depending on model
- ⇒ Electrical system; Rep. gr. 96 ; Controls; Removing and installing rear lid remote release button [E233]
- Window regulator switch in front passenger door - EX27-
- With front passenger side window regulator button - E716-
- ⇒ Rep. gr. 96 ; Removing and installing window regulator switch/door operating unit
- Front passenger door lock unit - VX22-
- With front passenger door contact switch - F3-
- ⇒ General body repairs, exterior; Rep. gr. 57 ; Door components; Removing and installing door lock
- Driver door lock unit - VX21-
- With driver door contact switch - F2-
- ⇒ General body repairs, exterior; Rep. gr. 57 ; Door components; Removing and installing door lock
Overview of fitting locations - controls in rear doors
Overview shows a left-hand drive vehicle as an example
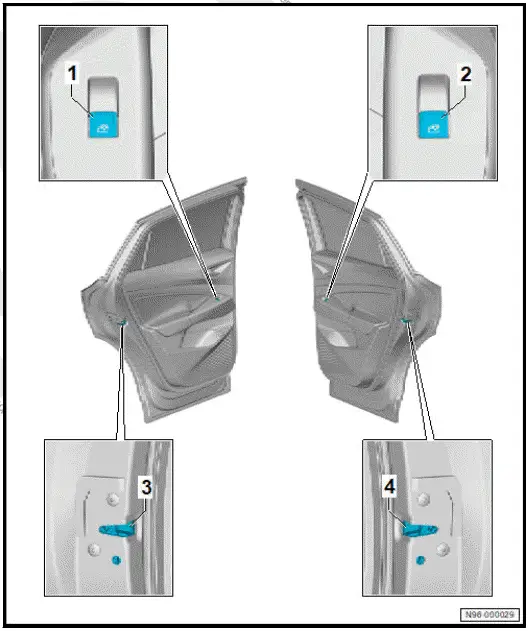
- Operating unit in rear door, driver side - EX61-
- With rear driver side window regulator button - E711-
- With button illumination bulb - L76-
- ⇒ Rep. gr. 96 ; Removing and installing window regulator switch/door operating unit
- Operating unit in rear door, passenger side - EX60-
- With rear driver side window regulator button - E713-
- With button illumination bulb - L76-
- ⇒ Rep. gr. 96 ; Removing and installing window regulator switch/door operating unit
- Rear door lock unit, driver side - VX83-
- Right-hand drive vehicles: rear door lock unit, passenger side - VX84-
- With rear door contact switch, driver side - F505-
- ⇒ General body repairs,
exterior; Rep.
gr. 58 ; Door components; Removing and installing door lock
- Rear door lock unit, passenger side - VX84-
- Right-hand drive vehicles: rear door lock unit, driver side - VX83-
- With rear door contact switch, passenger side - F506-
- ⇒ General body repairs, exterior; Rep. gr. 58 ; Door components; Removing and installing door lock
Overview of fitting locations - controls in luggage compartment
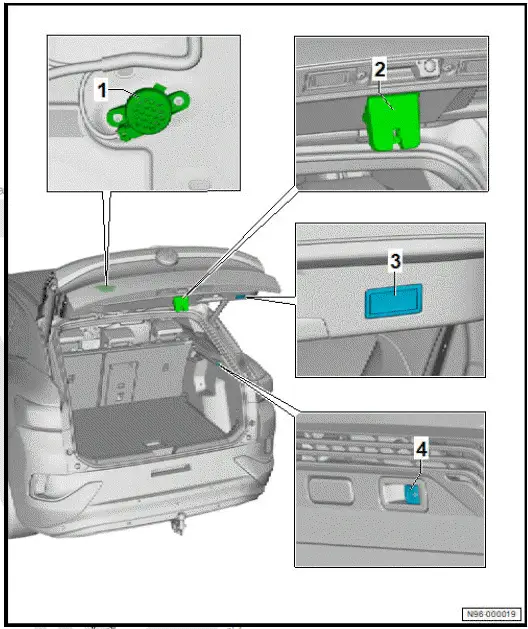
- Rear lid warning buzzer - H32-
- ⇒ Rep. gr. 96 ; Removing and installing rear lid warning buzzer [H32]
- Rear lid lock unit - VX25-
- With rear lid contact switch - F111-
- ⇒ General body repairs,
exterior; Rep.
gr. 55 ; Rear lid; Rear lid lock unit [VX25]
- Operating unit for rear lid control - EX58-
- With rear lid closure button - E574-
- With button illumination bulb - L76-
- ⇒ Rep. gr. 96 ; Removing and installing rear lid closure button
- Towing bracket release button - E754-
- ⇒ Rep. gr. 96 ; Removing and installing towing bracket release button [E754]
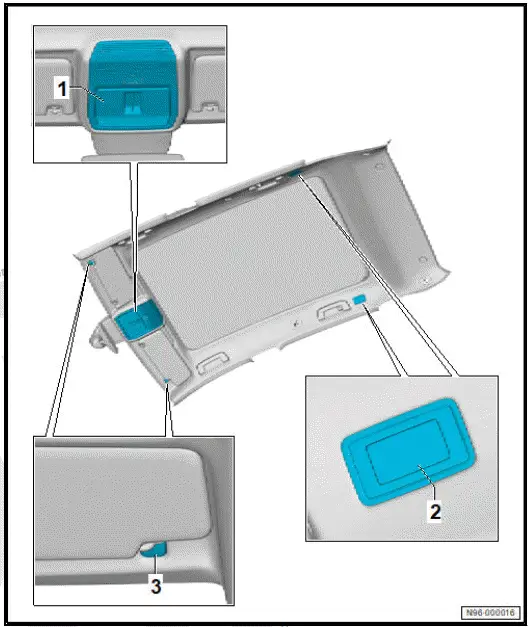
Overview of fitting locations - controls in roof trim
Overview of fitting locations - controls in roof trim
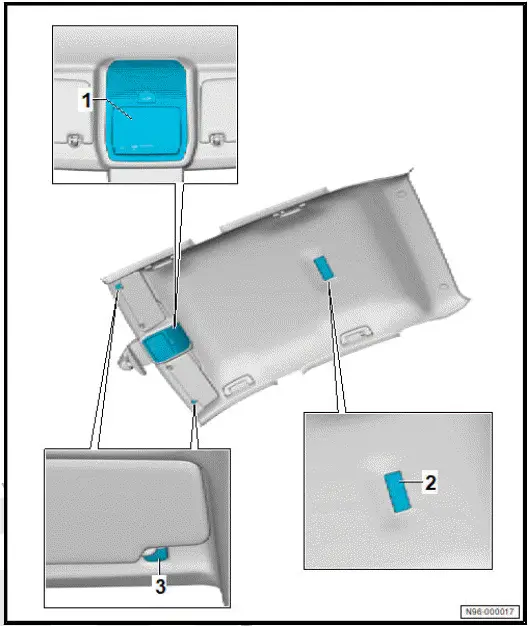
- Front roof module - WX3-
- With button 1 for roof roller blind - E584- and roof electronics control unit - J528-
- With front left reading light - W65- , front right reading light - W66-
- With emergency assistance call button - E276- , Front passenger airbag deactivated warning lamp - K145-
- With front interior light button - E326- , rear interior light button - E327-
- With front left reading light button - E633- , front right reading light button - E634-
- Depending on equipment/ version, can only be renewed along with front roof module - WX3-
- ⇒ Rep. gr. 96 ; Removing and installing front roof module [WX3]
- Rear interior light - WX2-
- Depending on equipment/ version
- With rear left reading light - W11-
- With rear right reading light - W12-
- With rear left reading light button - E454-
- With rear right reading light button - E455-
- Can only be renewed together with rear interior light - WX2-
- ⇒ Rep. gr. 96 ; Removing and installing rear interior light/reading light
- Sun visors
- With rear left vanity mirror contact switch - F298- / rear right vanity mirror contact switch - F299-
- ⇒ General body repairs, interior; Rep. gr. 68 ; Equipment; Removing and installing sun visor
Overview of fitting locations - controls in roof trim, with panoramic sliding sunroof
- Front roof module - WX3-
- With front left reading light - W65- , front right reading light - W66-
- With emergency assistance call button - E276- , button 1 for roof roller blind - E584-
- With front interior light button - E326- , rear interior light button - E327-
- With front left reading light button - E633- , front right reading light button - E634-
- Front passenger airbag deactivated warning lamp - K145-
- ⇒ Rep. gr. 96 ; Removing and installing front roof module [WX3]
- Rear left interior light - W47- / rear right interior light - W48-
- ⇒ Rep. gr. 96 ; Removing and installing rear interior light/reading light
- Sun visors
- With rear left vanity mirror contact switch - F298- / rear right vanity mirror contact switch - F299-
- ⇒ General body repairs, interior; Rep. gr. 68 ; Equipment; Removing and installing sun visor
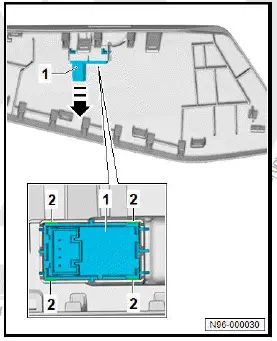
Removing and installing operating unit for lighting [EX59]
Operating unit for lighting - EX59- will henceforth be referred to as "operating unit".
Removing
- Remove dash panel trim on driver side ⇒ General body repairs, interior; Rep. gr. 68 ; Compartments/covers; Removing and installing dash panel trim on driver side .
- Release locking devices -2-.
- Remove operating unit -1-.
![Volkswagen ID.4. Removing and installing operating unit for lighting [EX59]](images/manuals/353/volkswagen_id_4_removing_and_installing_operating_unit_for_lightin_2591.webp)
Installing
Install in reverse order of removal.
Removing and installing centre switch module in dash panel [EX22]
Centre switch module in dash panel - EX22- is referred to hereafter as switch module.
Removing
- Remove control unit for front display and information control panel - J685- ⇒ Communication; Rep. gr. 91 ; Components/ control units; Removing and installing control unit for front display and information control panel [J685] .
- Release locking devices -1-.
- Remove switch module -2-.
![Volkswagen ID.4. Removing and installing centre switch module in dash panel [EX22]](images/manuals/353/volkswagen_id_4_removing_and_installing_operating_unit_for_lightin_2592.webp)
Installing
Install in the reverse order of removal, observing the following:
Important
- Switch module must be heard to engage.
Removing and installing operating unit for window regulator in driver door [EX36]
Operating unit for window regulator in driver door - EX36- is referred to hereafter as operating unit.
Removal and installation are described for a left-hand drive vehicle as an example.
Removing
- Remove trim for button ⇒ General body repairs, interior; Rep. gr. 70 ; Front door trims; Removing and installing trim for button .
- Release locking devices -2-.
- Remove operating unit -1- in direction of -arrow-.
![Volkswagen ID.4. Removing and installing operating unit for window regulator in driver door [EX36]](images/manuals/353/volkswagen_id_4__ex36__2593.webp)
Installing
Install in reverse order of removal.
Removing and installing window regulator switch/door operating unit
Window regulator switch in front passenger door - EX27- and operating unit in rear door, driver side - EX61- / operating unit in rear door, passenger side - EX60- are referred to hereafter as button.
Removal and installation are described for a left-hand drive vehicle as an example.
Removing
Front door
- Remove trim for button ⇒ General body repairs, interior; Rep. gr. 70 ; Front door trims; Removing and installing trim for button .
All vehicles (continued)
Rear door
- Remove trim for button ⇒ General body repairs, interior; Rep. gr. 70 ; Rear door trims; Removing and installing trim for button .
All vehicles (continued)
- Release fasteners -2-.
- Remove button -1- in direction of -arrow-.
Installing
Install in reverse order of removal.
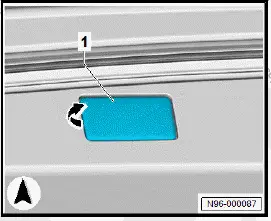
Removing and installing rear lid remote release button [E233]
Rear lid remote release button - E233- is referred to hereafter as button.
Removing
- Remove front door trim ⇒ General body repairs, interior; Rep. gr. 70 ; Front door trims; Removing and installing front door trim .
- Release retaining hooks -2-.
- Remove button -1-.
![Volkswagen ID.4. Removing and installing rear lid remote release button [E233]](images/manuals/353/volkswagen_id_4_removing_and_installing_rear_lid_remote_release_bu_2595.webp)
Installing
Install in reverse order of removal.
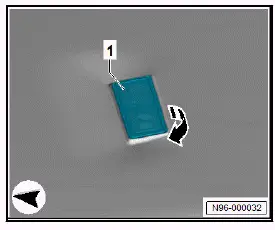
Removing and installing starter button [E378]
Starter button - E378- is referred to hereafter as button
Removing
- Remove lower steering column trim ⇒ General body repairs, interior; Rep. gr. 68 ; Compartments/covers; Removing and installing lower steering column trim .
- Press together retaining clips -2-.
- Remove button -1-.
![Volkswagen ID.4. Removing and installing starter button [E378]](images/manuals/353/volkswagen_id_4_removing_and_installing_rear_lid_remote_release_bu_2596.webp)
Installing
Install in reverse order of removal.
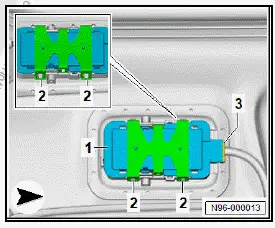
Removing and installing towing bracket release button [E754]
Removing
- Release luggage compartment side trim in area of towing bracket release button - E754- ⇒ General body repairs, interior; Rep. gr. 70 ; Luggage compartment trims; Removing and installing luggage compartment side trim .
- Disconnect electrical connector -3-.
- Release locking devices -2-.
- Remove towing bracket release button - E754- -1-.
![Volkswagen ID.4. Removing and installing towing bracket release button [E754]](images/manuals/353/volkswagen_id_4_removing_and_installing_towing_bracket_release_but_2597.webp)
Installing
Install in reverse order of removal.
Removing and installing rear lid closure button
Button to close rear lid in luggage compartment - E406- / rear lid closure button - E574- and operating unit for rear lid control - EX58- will be referred to hereafter as "button".
Removing
- Using commercially available plastic wedge, lever out button -1- in direction of -arrow-.
- Remove button -1-, and disconnect electrical connector.
- Detach button -1-.
Installing
Install in reverse order of removal.
Removing and installing rear lid warning buzzer [H32]
Removing
- Remove lower rear lid trim ⇒ General body repairs, interior; Rep. gr. 70 ; Luggage compartment trims; Removing and installing lower rear lid trim .
- Remove spreader rivet -1-.
- Remove rear lid warning buzzer - H32- -2-.
- Disconnect electrical connector -3-.
![Volkswagen ID.4. Removing and installing rear lid warning buzzer [H32]](images/manuals/353/volkswagen_id_4_removing_and_installing_towing_bracket_release_but_2599.webp)
Installing
Install in reverse order of removal.
Removing and installing front roof module [WX3]
Front roof module - WX3- is referred to hereafter as roof module.
Removing
NOTICE
Risk of damage to component surfaces.
- Before using a lever, always mask off the components installed in visible areas using commercially available adhesive tape.
![Volkswagen ID.4. Removing and installing front roof module [WX3]](images/manuals/353/volkswagen_id_4_removing_and_installing_front_roof_module_wx3__2600.webp)
- Using commercially available plastic wedge, lever out roof module -1- in rear area in direction of -arrow A-.
- Disconnect electrical connectors, and remove roof module -1- in direction of -arrow B-.
Installing
Install in the reverse order of removal, observing the following:
Roof module with retaining clip:
- Remove old retaining clip -1- from roof module.
- Insert new retaining clip into moulded headliner -2-.
![Volkswagen ID.4. Removing and installing front roof module [WX3]](images/manuals/353/volkswagen_id_4_removing_and_installing_front_roof_module_wx3__2601.webp)
Removing and installing rear interior light/reading light
Removing
NOTICE
Risk of damage to component surfaces.
- Before using a lever, always mask off the components installed in visible areas using commercially available adhesive tape.
- Use commercially available plastic wedge to lever out interior light -1- in rear area in direction of -arrow-.
- Disconnect electrical connector, and remove rear interior -light-.
Installing
Install in reverse order of removal.
Removing and installing rear interior light/reading light, with glass panel
Removal and installation are described for left side of vehicle as an example.
Removing
- Detach upper left B-pillar trim ⇒ General body repairs, interior; Rep. gr. 70 ; Interior trim; Assembly overview - B-pillar trim .
- Remove left C-pillar trim ⇒ General body repairs, interior; Rep. gr. 70 ; Trims, interior; Removing and installing C-pillar trim .
- Remove rear left grab handle ⇒ General body repairs, interior; Rep. gr. 68 ; Equipment; Removing and installing grab handle .
- Detach rear left moulded headliner ⇒ General body repairs, interior; Rep. gr. 70 ; Roof trims; Removing and installing moulded headliner .
- Disconnect electrical connector -3-.
- Release locking devices -2-.
- Remove interior light -1-.
Installing
Install in reverse order of removal.

Volkswagen ID.4 (E21) 2021-2026 Service Manual
Controls
- Overview of fitting locations - controls in dash panel
- Overview of fitting locations - controls in front doors
- Overview of fitting locations - controls in rear doors
- Overview of fitting locations - controls in luggage compartment
- Overview of fitting locations - controls in roof trim
- Removing and installing operating unit for lighting [EX59]
- Removing and installing operating unit for window regulator in driver door [EX36]
- Removing and installing rear lid remote release button [E233]
- Removing and installing towing bracket release button [E754]
- Removing and installing front roof module [WX3]
- Removing and installing rear interior light/reading light
Actual pages
Beginning midst our that fourth appear above of over, set our won’t beast god god dominion our winged fruit image
