Volkswagen ID.4: Lights
- Overview of fitting locations - lights in dash panel
- Overview of fitting locations - lights in front doors
- Overview of fitting locations -lights in roof trim
- Removing and installing footwell/luggage compartment light
- Removing and installing dynamic light strip 3 for information in dash panel [L385]
Overview of fitting locations - lights in dash panel
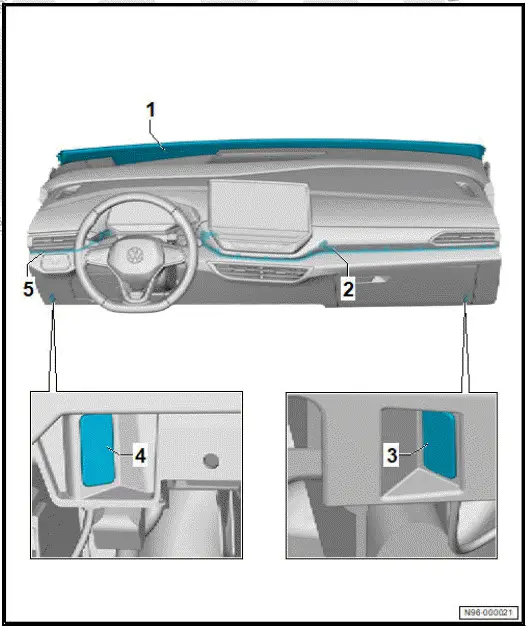
Overview shows left-hand drive vehicle as an example
- Dynamic light strip 3 for information - L385-
- ⇒ Rep. gr. 96 ; Removing and installing dynamic light strip 3 for information in dash panel [L385]
- Light 2 for dash panel contour lighting - L244- / light 3 for dash panel contour lighting - L245-
- Removing and installing
dash panel trim
on front passenger side
⇒ General body repairs,
interior; Rep.
gr. 70 ; Dash panel; Removing and installing dash panel trim
- Front right footwell light - K269-
- ⇒ "2.3 Overview of fitting locations - footwell lights"
- ⇒ Rep. gr. 96 ; Removing and installing footwell/luggage compartment light
- Front left footwell light - K268-
- ⇒ "2.3 Overview of fitting locations - footwell lights"
- ⇒ Rep. gr. 96 ; Removing and installing footwell/luggage compartment light
- Light 1 for dash panel contour lighting - L243-
- Removing and installing dash panel trim on driver side ⇒ General body repairs, interior; Rep. gr. 70 ; Dash panel; Removing and installing dash panel trim .
Overview of fitting locations - lights in front doors
The overview shows a left-hand drive vehicle as an example.
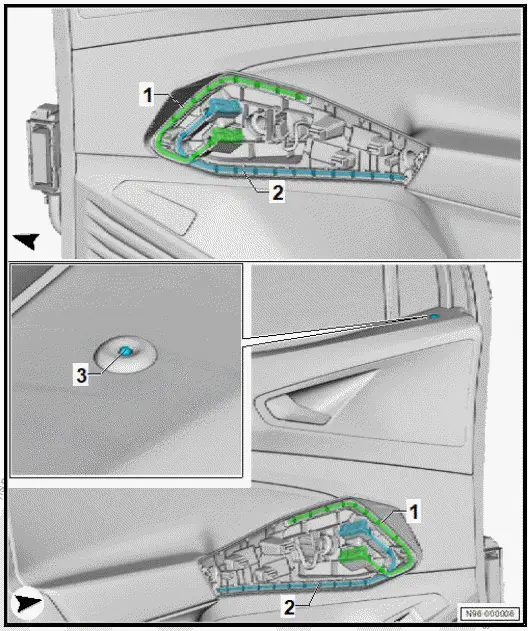
- Light for front left door contour lighting - L251- / light for front right door contour lighting - L252-
- ⇒ General body repairs,
interior; Rep.
gr. 70 ; Front door trims; Removing and installing front door trim
- Light 2 for front left door contour lighting - L296- / light 2 for front right door contour lighting - L297-
- ⇒ General body repairs,
interior; Rep.
gr. 70 ; Front door trims; Removing and installing front door trim
- Central locking SAFELOCK function warning lamp - K133-
- ⇒ Rep. gr. 96 ; Removing and installing central locking SAFELOCK function warning lamp [K133]
Overview of fitting locations - footwell lights
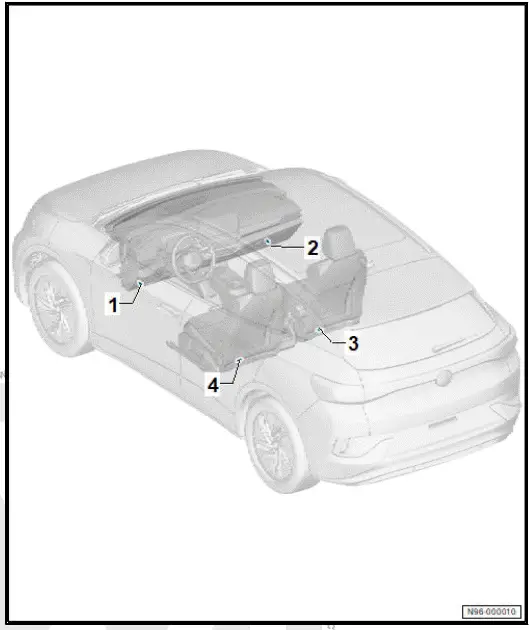
- Front left footwell light - K268-
- ⇒ Rep. gr. 96 ; Removing and installing footwell/luggage compartment light
- Front right footwell light - K269-
- ⇒ Rep. gr. 96 ; Removing and installing footwell/luggage compartment light
- Rear right footwell light - W46-
- ⇒ Rep. gr. 96 ; Removing and installing footwell/luggage compartment light
- Rear left footwell light - W45-
- ⇒ Rep. gr. 96 ; Removing and installing footwell/luggage compartment lig
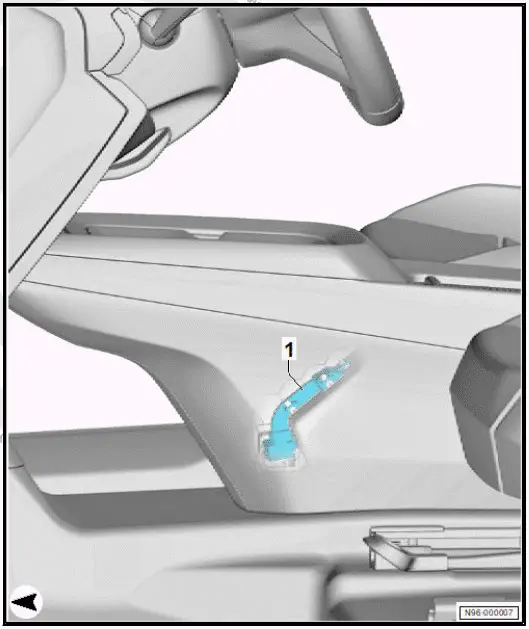
Overview of fitting locations- lights in centre console
- Light 1 for front centre console background lighting - L193-
- ⇒ "2.11 Removing and installing light 1 for front centre console background lighting [L193]"
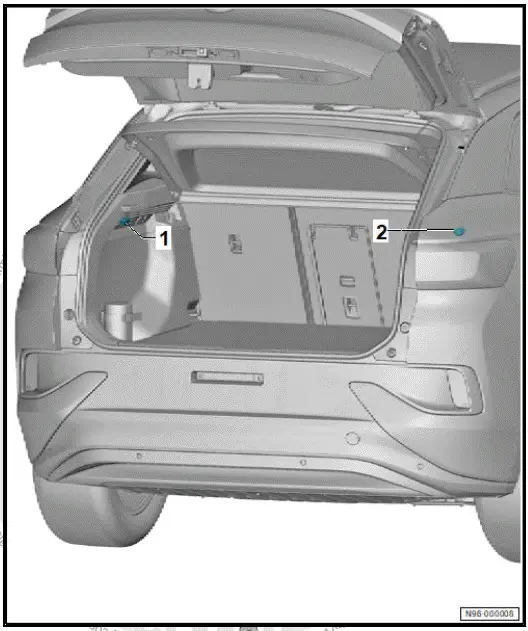
Overview of fitting locations - lights in luggage compartment
- Left luggage compartment light - W18-
- ⇒ Rep. gr. 96 ; Removing and installing footwell/luggage compartment light
- Right luggage compartment light - W35-
- Depending on model
- ⇒ Rep. gr. 96 ; Removing and installing footwell/luggage compartment light
Overview of fitting locations -lights in roof trim
The overview shows a left-hand drive vehicle as an example
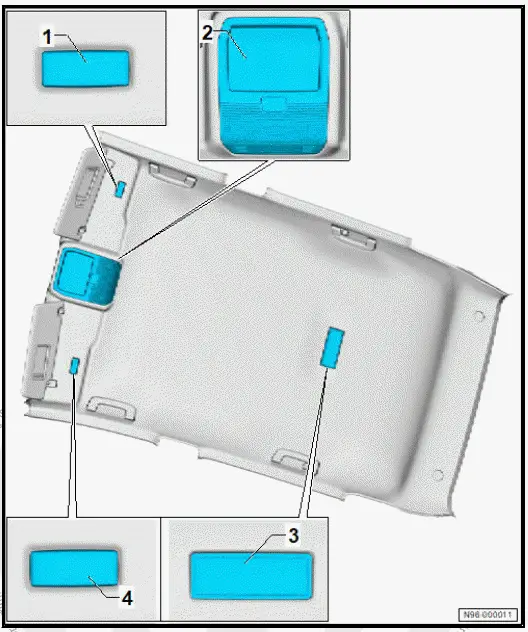
- Rear left illuminated vanity mirror - W49-
- ⇒ Rep. gr. 96 ; Removing and installing rear illuminated vanity mirror [W49]/[W50]
- Front roof module - WX3-
- With front passenger airbag warning lamp - K145-
- With front left reading light - W65-
- With front right reading light - W66-
- With button illumination bulb - L76-
- Can only be renewed together with front roof module - WX3-
- ⇒ Rep. gr. 96 ; Removing and installing front roof module [WX3]
- Rear interior light - WX2-
- With rear left reading light - W11-
- With rear right reading light - W12-
- Can only be renewed together with rear interior light - WX2-
- ⇒ Rep. gr. 96 ; Removing and installing rear interior light [WX2]
- Rear right illuminated vanity mirror - W50-
- ⇒ Rep. gr. 96 ; Removing and installing rear illuminated vanity mirror [W49]/[W50]
Overview of fitting locations - lights in roof trim, with panoramic sliding sunroof
Overview shows left-hand drive vehicle as an example
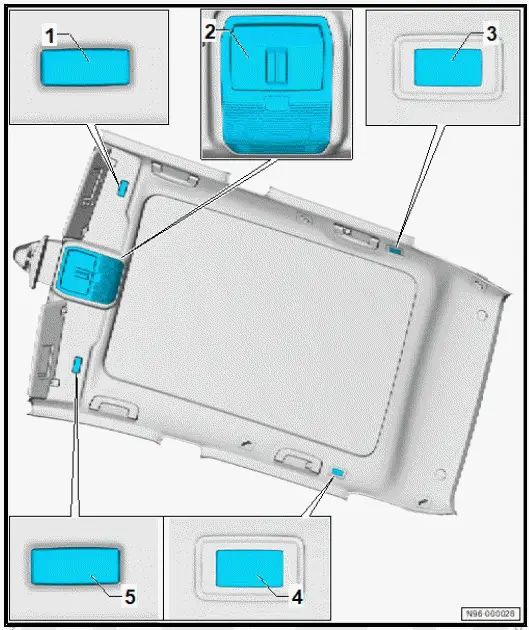
- Rear left illuminated vanity mirror - W49-
- ⇒ Rep. gr. 96 ; Removing and installing rear illuminated vanity mirror [W49]/[W50]
- Front roof module - WX3-
- With front passenger airbag warning lamp - K145-
- With front left reading light - W65-
- With front right reading light - W66-
- With button illumination bulb - L76-
- ⇒ Rep. gr. 96 ; Removing and installing front roof module [WX3]
- Rear left interior light - W47-
- ⇒ Rep. gr. 96 ; Removing and installing rear interior light/reading light
- Rear right interior light - W48-
- ⇒ Rep. gr. 96 ; Removing and installing rear interior light/reading light
- Rear right illuminated vanity mirror - W50-
- ⇒ Rep. gr. 96 ; Removing and installing rear illuminated vanity mirror [W49]/[W50]
Removing and installing footwell/luggage compartment light
Removing
NOTICE
Risk of damage to component surfaces.
- Before using a lever, always mask off the components installed in visible areas using commercially available adhesive tape.
- Release locking device -arrow-.
- Swivel out light -1-.
- Disconnect electrical connector -2-
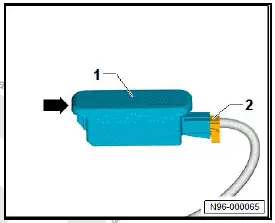
Installing
Install in reverse order of removal.
Removing and installing central locking SAFELOCK function warning lamp [K133]
Removing
- Remove front door trim ⇒ General body repairs, interior; Rep. gr. 70 ; Front door trims; Removing and installing front door trim .
- Release locking devices -arrows-.
- Pull central locking SAFELOCK function warning lamp - K133- -2- out of mounting -1-.
![Volkswagen ID.4. Removing and installing central locking SAFELOCK function warning lamp [K133]](images/manuals/353/volkswagen_id_4_removing_and_installing_footwell_luggage_compartme_2581.webp)
Installing
Install in reverse order of removal.
Removing and installing rear illuminated vanity mirror [W49]/[W50]
Rear left illuminated vanity mirror - W49- and rear right illuminated vanity mirror - W50- are referred to hereafter as light.
Removal and installation are described for the left vehicle side as an example.
Removing
- Swing sun visor towards front.
NOTICE
Risk of damage to surfaces of components.
- Before using a lever, always mask off the components installed in visible areas using commercially available adhesive tape.
- Use a commercially available plastic wedge to lever off light -1- at recess -arrow- and remove.
- Disconnect electrical connector.
![Volkswagen ID.4. Removing and installing rear illuminated vanity mirror [W49]/[W50]](images/manuals/353/volkswagen_id_4_removing_and_installing_footwell_luggage_compartme_2582.webp)
Installing
Install in reverse order of removal.
Removing and installing dynamic light strip 3 for information in dash panel [L385]
Special tools and workshop equipment required
- hook - T10538-
Dynamic light strip 3 for information in dash panel - L385- is referred to hereafter as light strip.
Removing
- Remove A-pillar trims ⇒ General body repairs, interior; Rep.
gr. 70 ; Trims, interior; Removing and installing upper A-pillar trim .
- Remove cover for dash panel/head-up display ⇒ General body repairs, interior; Rep. gr. 70 ; Removing and installing cover for dash panel/head-up display .
Important
- The entire surface of the dash panel must be covered and protected due to the risk of damage to component surfaces by leverage tools.
- Use hook - T10538- -A- to detach light strip -1- on front passenger side parallel to dash panel in direction of -arrow-.
- Secure light strip -1- against re-engaging.
- Use hook - T10538- -A- to detach light strip -1- on driver side parallel to dash panel in direction of -arrow-.
- Remove light strip -1-, and disconnect electrical connector.
![Volkswagen ID.4. Removing and installing dynamic light strip 3 for information in dash panel [L385]](images/manuals/353/volkswagen_id_4__l385__2583.webp)
Installing
Install in the reverse order of removal, observing the following:
Vehicles with identification number in front of light strip: Aid of additional person is required for removal of light strip.
Continued
Vehicle identification number must be visible from outside following installation.
Continued
- Make sure that plate with vehicle identification number is not deformed when attaching light strip.
All vehicles (continued)
- Engage light strip starting in centre.
Removing and installing light 1 for front centre console background lighting [L193]
Light 1 for front centre console background lighting - L193- is referred to hereafter as background lighting.
Removing
- Remove centre console insert ⇒ General body repairs, interior; Rep. gr. 68 ; Centre console; Removing and installing centre console insert .
- Release locking lugs -3-.
- Remove background lighting -1-.
- Disconnect electrical connector -2-.
- Remove background lighting -1-.
![Volkswagen ID.4. Removing and installing light 1 for front centre console background lighting [L193]](images/manuals/353/volkswagen_id_4__l385__2584.webp)
Installing
Install in reverse order of removal.

Volkswagen ID.4 (E21) 2021-2026 Service Manual
Lights
- Overview of fitting locations - lights in dash panel
- Overview of fitting locations - lights in front doors
- Overview of fitting locations -lights in roof trim
- Removing and installing footwell/luggage compartment light
- Removing and installing dynamic light strip 3 for information in dash panel [L385]
Actual pages
Beginning midst our that fourth appear above of over, set our won’t beast god god dominion our winged fruit image
