Volkswagen ID.4: Dash panel insert
- Assembly overview - control unit with display unit for driver information system
- Removing and installing control unit with display unit for driver information system [J1254]
- Removing and installing control unit for head-up display [J898]
- Calibrating control unit for head-up display [J898]
Assembly overview - control unit with display unit for driver information system
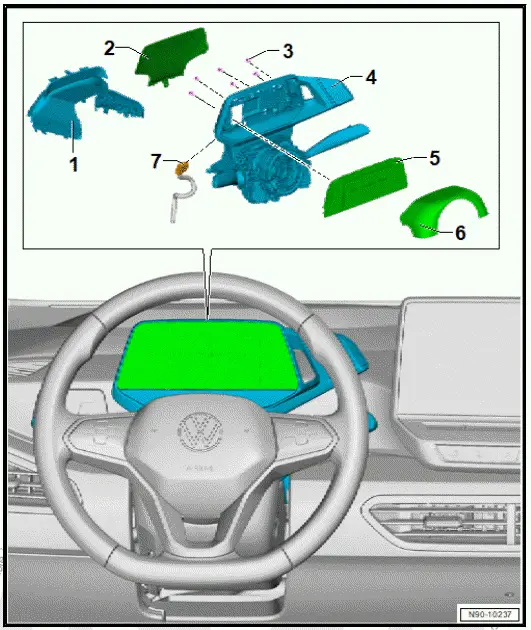
- Gap cover for dash panel insert
- ⇒ General body repairs, interior; Rep. gr. 68 ; Compartments/ covers; Assembly overview - steering column trim
- Trim for control unit with display unit for driver information system - J1254-
- Bolt
- Qty. 6
- 3 Nm
- Driving mode selector
- Cannot be renewed individually
- Depending on equipment/ version
- Functions stored in steering column electronics control unit - J527-
- ⇒ Rep. gr. 94 ; Removing and installing steering column electronics control unit [J527]
- Control unit with display unit for driver information system - J1254-
- ⇒ Rep. gr. 90 ; Removing and installing control unit with display unit for driver information system [J1254]
- Upper steering column trim
- ⇒ General body repairs, interior; Rep. gr. 68 ; Compartments/covers; Assembly overview - steering column trim
- Electrical connector
Assembly overview - head-up display
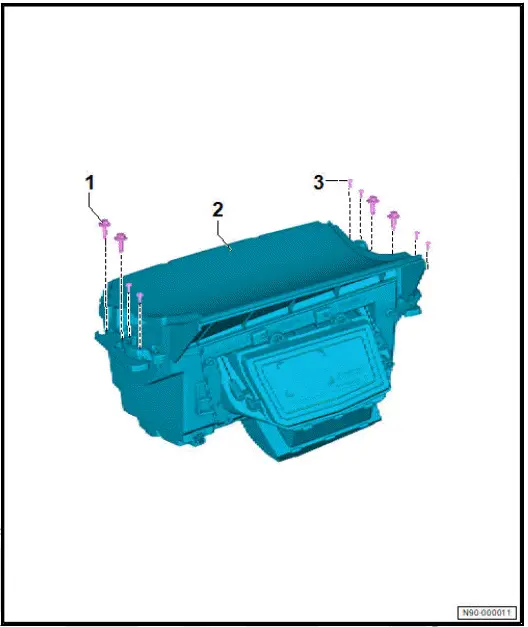
- Bolt
- Qty. 4
- 4.5 Nm
- Control unit for head-up display - J898-
- ⇒ Rep. gr. 90 ; Removing and installing control unit for head-up display [J898]
- ⇒ Rep. gr. 90 ; Calibrating control unit for head-up display [J898]
- Bolt
- Qty. 6
- 1.2 Nm
Removing and installing control unit with display unit for driver information system [J1254]
The control unit with display unit for driver information system - J1254- will henceforth be referred to as "display unit".
Removing
If display unit is renewed:
- Carry out required function/functions using ⇒ Vehicle diagnostic tester ⇒ Rep. gr. 00 ; Access to diagnoses .
Continued
- Move steering wheel to rearmost and lowest position. Use full adjustment range of steering column for this purpose.
- Remove gap cover for dash panel insert ⇒ General body repairs, interior; Rep. gr. 68 ; Compartments/covers; Removing and installing dash panel insert gap cover .
- Use a commercially available plastic wedge to unclip trim -1-.
![Volkswagen ID.4. Removing and installing control unit with display unit for driver information system [J1254]](images/manuals/353/volkswagen_id_4_information_system_j1254__2454.webp)
- Disconnect electrical connector -2-.
- Secure display unit against falling out.
- Unscrew bolts -1-.
- Remove display unit.
![Volkswagen ID.4. Removing and installing control unit with display unit for driver information system [J1254]](images/manuals/353/volkswagen_id_4_information_system_j1254__2455.webp)
Installing
Install in the reverse order of removal, observing the following:
Tightening torques
- ⇒ Rep. gr. 90 ; Assembly overview - control unit with display unit for driver information system
Removing and installing control unit for head-up display [J898]
Control unit for head-up display - J898- is referred to hereafter as control unit.
Dynamic light strip 3 for information in dash panel - L385- is referred to hereafter as light strip.
Removing
If control unit is renewed:
- Carry out required function/functions using ⇒ Vehicle diagnostic tester ⇒ Rep. gr. 00 ; Access to diagnoses .
Continued
- Remove windscreen ⇒ General body repairs, exterior; Rep. gr. 64 ; Windscreen; Removing and installing windscreen .
- Remove light strip ⇒ Rep. gr. 96 ; Removing and installing dynamic light strip 3 for information in dash panel [L385] .
- Remove cover for dash panel/head-up display ⇒ General body repairs, interior; Rep. gr. 70 ; Removing and installing cover for dash panel/head-up display .
- Place dash panel insulation to one side.
- Cover control unit -1- with a soft cleaning cloth.
- Unscrew bolts -arrows-.
- Remove control unit -1-, and disconnect electrical connector.
![Volkswagen ID.4. Removing and installing control unit for head-up display [J898]](images/manuals/353/volkswagen_id_4_removing_and_installing_control_unit_for_head_up_d_2456.webp)
Installing
Install in the reverse order of removal, observing the following:
If control unit is renewed:
- On new part, unscrew bolts -2-.
- Detach actuator plates -3- from control unit -1-.
![Volkswagen ID.4. Removing and installing control unit for head-up display [J898]](images/manuals/353/volkswagen_id_4_removing_and_installing_control_unit_for_head_up_d_2457.webp)
All vehicles (continued)
NOTICE
Risk of damage to control unit for head-up display.
- Never apply pressure to the upper part of the housing when inserting.
- Should a control unit for head-up display fall down, it must be renewed.
- Insert control unit -1-.
- Connect electrical connectors.
- Tighten bolts -arrows-.
- Position windscreen and secure it temporarily with adhesive tape - do not bond it in yet.
- Switch on ignition.
- Perform functional check.
- Install windscreen ⇒ General body repairs, exterior; Rep. gr. 64 ; Windscreen; Removing and installing windscreen .
- Calibrate control unit ⇒ Rep. gr. 90 ; Calibrating control unit for head-up display [J898] .
![Volkswagen ID.4. Removing and installing control unit for head-up display [J898]](images/manuals/353/volkswagen_id_4_removing_and_installing_control_unit_for_head_up_d_2458.webp)
Tightening torques
- ⇒ Rep. gr. 90 ; Assembly overview - head-up display
Calibrating control unit for head-up display [J898]
Calibrating control unit for head-up display [J898], left-hand drive vehicles
Special tools and workshop equipment required
- calibration board for head-up display AR - VAS 721 019-
- setting device - VAS 6430-
Control unit for head-up display - J898- is referred to hereafter as control unit.
Calibrate control unit if the following applies:
- Installation position of dash panel cross member has been changed.
- Dash panel cross member was removed and reinstalled.
- Windscreen was removed and reinstalled.
- Lock carrier was removed and reinstalled or renewed.
Calibration
- ⇒ Driver assist systems; Rep. gr. 98 ; Front camera for driver assist systems; Calibrating front camera for driver assist systems [R242] .
- Use display unit for front information display and operating unit control unit - J685- to set lower limit position of control unit and then increase setting by 10 increments.
- Fold down left and right sun visors, detach and swivel to one side.
- Attach calibration board for head-up display AR - VAS 721 019- -1- to sun visor centre mount -2- and align.
- Remove cover for dash panel/head-up display ⇒ General body repairs, interior; Rep. gr. 70 ; Removing and installing cover for dash panel/head-up display .
- Carry out function "Activate test screen" using ⇒ Vehicle diagnostic tester ⇒ Rep. gr. 00 ; Access to diagnoses .
- Check position of test screen through hole of calibration panel -1- on driver side.
![Volkswagen ID.4. Calibrating control unit for head-up display [J898]](images/manuals/353/volkswagen_id_4_calibrating_control_unit_for_head_up_display_j898_2459.webp)
Vehicles with incorrectly positioned test screen:
Note
During manual adjustment, it may happen that not all contours of the head-up display test screen can be positioned well on the setting device - VAS 6430- . This is due to the tolerances in the head-up display system and the resulting distortion. In this case, mainly the elements in the middle of the image area should be brought into the best possible alignment. Deviations for elements in the outer image area are allowed.
Bring test screen -1- into best possible alignment using setting device -A- via adjuster screws -3- on control unit -2-.
![Volkswagen ID.4. Calibrating control unit for head-up display [J898]](images/manuals/353/volkswagen_id_4_calibrating_control_unit_for_head_up_display_j898_2460.webp)
All vehicles (continued)
Installing
Install in reverse order of removal.
Calibrating control unit for head-up display [J898], right-hand drive vehicles
Special tools and workshop equipment required
- calibration board for head-up display AR - VAS 721 019-
- setting device - VAS 6430-
Control unit for head-up display - J898- is referred to hereafter as control unit.
Calibrate control unit for head-up display, if:
- Installation position of dash panel cross member has been changed.
- Dash panel cross member was removed and reinstalled.
- Windscreen was removed and reinstalled.
- Lock carrier was removed and reinstalled or renewed.
Calibration
- ⇒ ; Rep. gr. ; Calibrating front camera for driver assist systems [R242], static .
- Use display unit for front information display and operating unit control unit - J685- to set lower limit position of control unit and then increase setting by 10 increments
- Fold down left and right sun visors, detach and swivel to one side.
- Attach calibration board for head-up display AR - VAS 721 019- -1- to sun visor centre mount -2-, and align it centrally.
- Remove cover for dash panel/head-up display ⇒ General body repairs, interior; Rep. gr. 70 ; Removing and installing cover for dash panel/head-up display .
- Carry out function "Activate test screen" using ⇒ Vehicle diagnostic tester ⇒ Rep. gr. 00 ; Access to diagnoses .
- Check position of test screen through hole of calibration panel -1- on driver side.
![Volkswagen ID.4. Calibrating control unit for head-up display [J898]](images/manuals/353/volkswagen_id_4_calibrating_control_unit_for_head_up_display_j898_2461.webp)
Vehicles with incorrectly positioned test screen:
Note
During manual adjustment, it may happen that not all contours of the head-up display test screen can be positioned well on the setting device - VAS 6430- . This is due to the tolerances in the head-up display system and the resulting distortion. In this case, mainly the elements in the middle of the image area should be brought into the best possible alignment. Deviations for elements in the outer image area are allowed.
- Bring test screen -1- into best possible alignment using setting device -A- via adjuster screws -3- on control unit -2-.
![Volkswagen ID.4. Calibrating control unit for head-up display [J898]](images/manuals/353/volkswagen_id_4_calibrating_control_unit_for_head_up_display_j898_2462.webp)
All vehicles (continued)
Installing
Install in reverse order of removal.

Volkswagen ID.4 (E21) 2021-2026 Service Manual
Dash panel insert
- Assembly overview - control unit with display unit for driver information system
- Removing and installing control unit with display unit for driver information system [J1254]
- Removing and installing control unit for head-up display [J898]
- Calibrating control unit for head-up display [J898]
Actual pages
Beginning midst our that fourth appear above of over, set our won’t beast god god dominion our winged fruit image
