Volkswagen ID.4: Door windows
- Assembly overview - rear door window
- Removing and installing rear door window
- Removing and installing front door window
- Removing and installing rear door window
- Removing and installing fixed rear door window
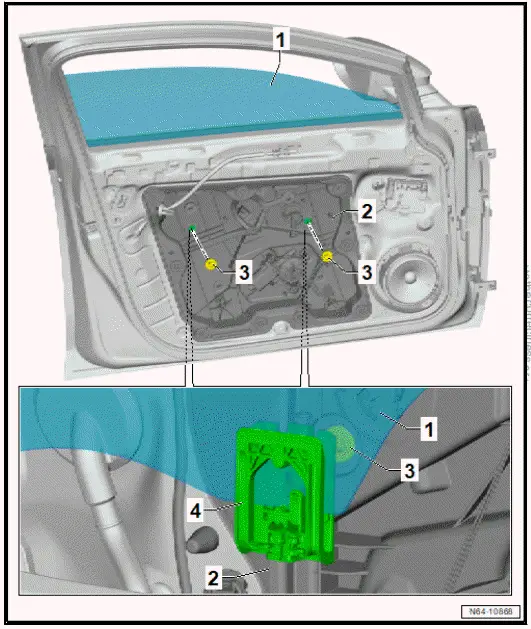
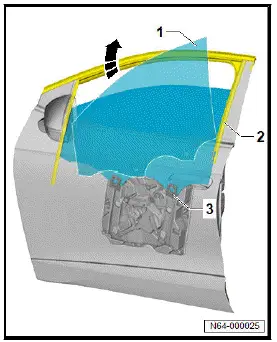
Assembly overview - rear door window
Overview shown for left side of vehicle as an example
- Front door window
- ⇒ Rep. gr. 64 ; Removing and installing front door window
- Door subframe
- ⇒ Rep. gr. 57 ; Assembly overview - assembly carrier
- ⇒ Rep. gr. 57 ; Removing and installing assembly carrier
- Cover
- Qty. 2
- Clamping bracket
- Qty. 2
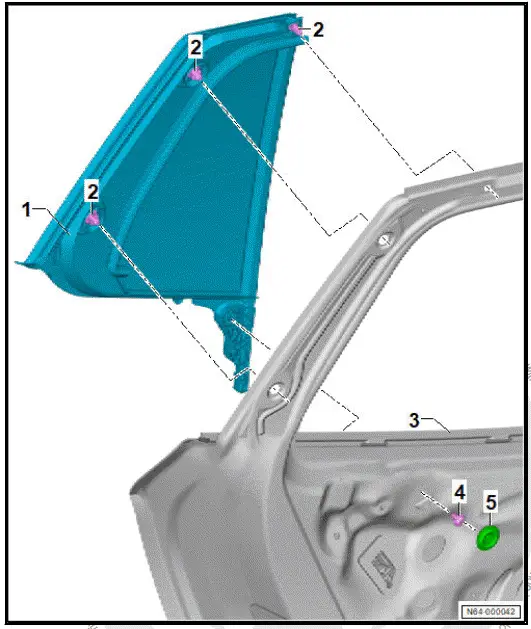
Assembly overview - fixed rear door window
The overview is shown for the left side of vehicle as an example.
- Fixed front door window
- ⇒ Rep. gr. 64 ; Removing and installing fixed front door window
- Bolt
- 8 Nm
- Cap
- Clip
- Qty. 2

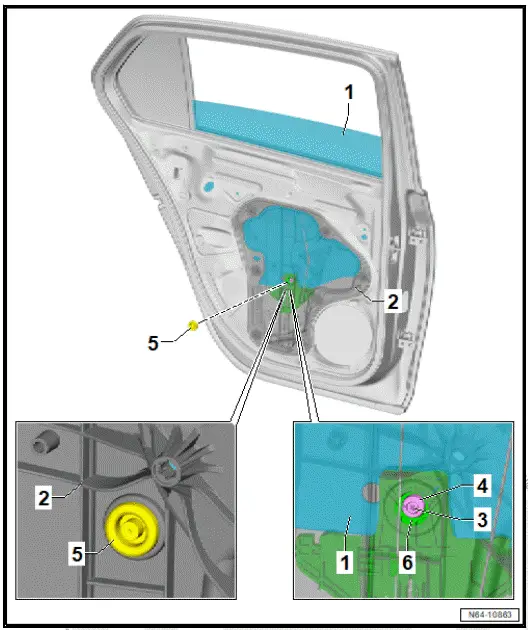
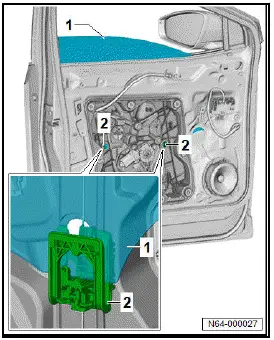
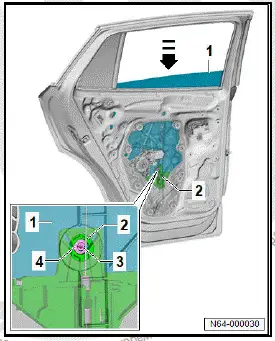
Removing and installing rear door window
Overview shown for left side of vehicle as an example
- Rear door window
- ⇒ Rep. gr. 64 ; Removing and installing rear door window
- Door subframe
- ⇒ Rep. gr. 58 ; Assembly overview - assembly carrier
- ⇒ Rep. gr. 58 ; Removing and installing assembly carrier
- Spreader rivet
- Depending on equipment/ version
- Spreader plug
- Depending on equipment/ version
- Cover
- Window regulator guide
- Depending on equipment/ version
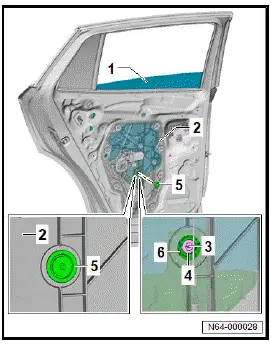
Assembly overview - fixed rear door window
Overview shown for left side of vehicle as an example
- Fixed rear door window
- ⇒ Rep. gr. 64 ; Removing and installing fixed rear door window
- Clip
- Qty. 3
- Rear door
- Bolt
- 8 Nm
- Cap
Removing and installing front door window
Removal and installation are described for left side of vehicle as an example.
The assembly carrier will henceforth be referred to as "carrier".
Carrier design Front door window is referred to hereafter as door window.
Driver side window regulator motor - V147- / front passenger side window regulator motor - V148- is referred to hereafter as window regulator motor.
Removing
- Remove front door trim ⇒ General body repairs, interior; Rep. gr. 70 ; Front door trims; Removing and installing front door trim .
If window regulator cannot be operated:
- Remove window regulator motor ⇒ Rep. gr. 57 ; Removing and installing window regulator motor [V147]/[V148] .
- Push door window -1- to required position.
All vehicles (continued)
Important
- Make sure to adhere to the following sequence: Release locking devices in area of B-pillar first, then proceed with locking devices in area of A-pillar.
- Lever out caps -3- from carrier -2- using commercially available plastic wedge.
- Lower door window -1- until clamping jaws of carrier -5- become accessible through opening in carrier -2-.
Note
The plastic shaft of the electrician's screwdriver protects the door window from damage.
- Guide commercially available electrician's screwdriver -4- through openings in carrier -2- and door window -1- towards clamping jaw of carrier -5-.
- Push commercially available electrician's screwdriver in direction of -arrow A- into locking devices of clamping jaws to release locking devices.
- To ensure that door window -1- does not fall back into locking devices, raise door window -1- in direction of -arrow B-.
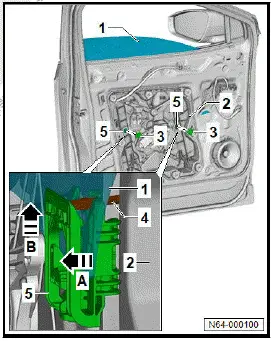
- Pull door window -1- upwards out of clamping jaws of carrier -3-.
- Lift door window -1- at rear, and swing it out of window guide -2- in direction of -arrow-.
Installing
Install in reverse order of removal, observing the following:
- Swing door window -1- in direction of -arrow- into window guide -2-.
Important
- Make sure that door window -1- is properly inserted into window guide -2-
- Guide door window -1- without force into clamping jaws of carrier.
- Align door window -1- with rear window frame.

Important
- Make sure to adhere to the following sequence: Engage locking devices in area of B-pillar first, then proceed with locking devices in area of A-pillar.
- Push door window -1- into clamping jaws of carrier -2- until door window -1- can be heard to engage.
- Test function before installing the front door trim.
Removing and installing rear door window
Special tools and workshop equipment required
- release tool - T10615-
Removal and installation are described for left side of vehicle as an example.
The assembly carrier will henceforth be referred to as "carrier".
Rear door window is referred to hereafter as door window.
Rear driver side window regulator motor - V471- / rear passenger side window regulator motor - V472- is referred to hereafter as window regulator motor.
Removing
- Remove rear door trim ⇒ General body repairs, interior; Rep. gr. 70 ; Rear door trim; Removing and installing rear door trim .
- Remove B-pillar trim on rear door ⇒ "3.13.2 Removing and installing B-pillar trim on rear door"
If power window cannot be operated
- Remove window regulator motor ⇒ Rep. gr. 58 ; Removing and installing rear window regulator motor [V471]/[V472]
- Push door window -1- to required position.
All vehicles (continued)
- Lever out cap -5- from carrier -2- using commercially available plastic wedge.
- Lower door window -1- until spreader rivet -3- and spreader plug -4- are accessible through opening in carrier -2-.
- Pull out spreader rivet -3- from spreader plug -4- using release tool - T10615- .
- Pull out spreader plug -4- from window channel -6- using release tool - T10615- , making sure that spreader plug -4- does not drop into door.
- Pull front section of window channel -2- out of mounting.
- Pull door window -1- in direction of -arrow- towards vehicle exterior and out of window slot.
Installing
Install in reverse order of removal, observing the following:
- With door window -1- removed, insert spreader plug -4- making sure it is centred properly.
- Press spreader rivet -3- into spreader plug -4- so it is flush.
- Insert door window -1- in direction of -arrow- into door, and push it into slot of window regulator guide.
- Press door window -1- into window regulator guide -2- until door window -1- engages audibly.
- Test function before installing the rear door trim.
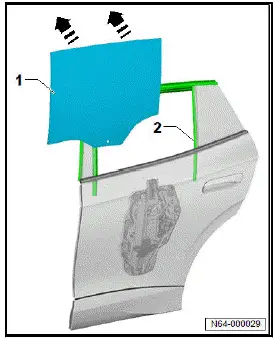
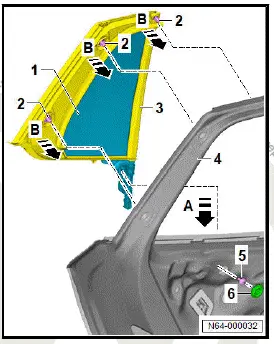
Removing and installing fixed rear door window
Special tools and workshop equipment required
- release tool - T10236-
Removal and installation are described for the left side of vehicle as an example.
Removing
- Remove rear door trim ⇒ General body repairs; interior; Rep. gr. 70 ; Rear door trims; Removing and installing rear door trim .
- Remove window channel ⇒ Rep. gr. 58 ; Removing and installing window channel .
- Lever off cap -7-.
- Unscrew bolt -6-.
- Pull seal -2- of fixed rear door window -1- off door flange.
- Push fixed rear door window -1- slightly in direction of -arrow A-, and use release tool - T10236- -3- to unclip clips -5- one after the other.
- Pull fixed rear door window -1- in direction of -arrow B- out of door -4-.

Installing
Install in reverse order of removal, observing the following:
- Guide fixed rear door window -1- with web in direction of -arrow A- into door -4-.
- Push fixed rear door window -1- in direction of -arrow Bagainst door -4- until clips -2- can be heard to engage.
- Tighten bolt -5-.
- Press seal -3- onto door flange all around.
- Fit cap -6-.
Tightening torques
- ⇒ Rep. gr. 64 ; Assembly overview - fixed rear door window

Volkswagen ID.4 (E21) 2021-2026 Service Manual
Door windows
- Assembly overview - rear door window
- Removing and installing rear door window
- Removing and installing front door window
- Removing and installing rear door window
- Removing and installing fixed rear door window
Actual pages
Beginning midst our that fourth appear above of over, set our won’t beast god god dominion our winged fruit image
