Volkswagen ID.4: Side windows
Assembly overview - rear side window
Overview shown for left side of vehicle as an example
- Rear side window
- Shape varies depending on model
- ⇒ Rep. gr. 64 ; Removing and installing rear side window
- ⇒ General information - body; Rep. gr. 52 ; General notes - windows; Removing broken window
- Body flange
- Clip
- Shape varies depending on model
- Qty. 3

Removing and installing rear side window
Special tools and workshop equipment required
- awl - V.A.G 1474/2-
- cutting cord - VAS 861 001/1A-
- cutting tool for bonded windows - VAS 6452-
- pull handle - V.A.G 1351/1-
- reel device - V.A.G 1654A-
- removal kit for flush bonded windows - V.A.G 1474B-
- setting gauge - 3371-
- wedges - V.A.G 1474/5-
Removal and installation are described for left side of vehicle as an example.
Rear side window will henceforth be referred to as "side window".
Removing
Removal of side window is described for use of removal kit for flush bonded windows - V.A.G 1474B- .
It is also possible to use cutting tool for bonded windows - VAS 6452- .
- Remove luggage compartment side trim ⇒ General body repairs, interior; Rep. gr. 70 ; Luggage compartment trims; Removing and installing luggage compartment side trim .
NOTICE
Risk of damage to surfaces of components.
- Mask off surrounding components in the visible area with commercially available adhesive tape.
- Push side window seal to side, while pulling cutting cord - VAS 861 001/1A- -1- with awl - V.A.G 1474/2- -2- inwards through adhesive sealant.
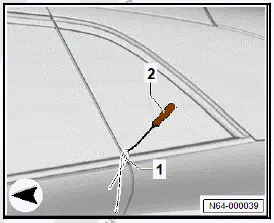
- Secure one end of cutting cord -3- to pull handle - V.A.G 1351/1- -2- to counterhold.
- Insert cutting cord -3- behind seal in window flange with aid of awl - V.A.G 1474/2- -1-.
- Secure end of cutting cord -1- to reel device - V.A.G 1654A- -3- in vehicle interior.
Note
Greater force is required in the area of the clips -4-.
- Cut side window free by repositioning the reel device -3- accordingly.
Important
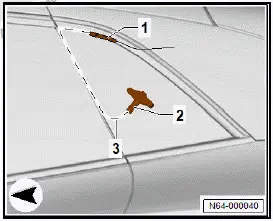
- When cutting out, ensure there is clearance at window flange.
Press cutting cord -1- against window with wedges - V.A.G 1474/5- -2- when cutting.
Installing
Install in reverse order of removal, observing the following:
Undamaged windscreen
- ⇒ General information - body; Rep. gr. 52 ; Use of adhesives; Preparing undamaged windows for installation .
All vehicles (continued)
New windscreen
- ⇒ General information - body; Rep. gr. 52 ; Use of adhesives; Preparing new windows for installation .
All vehicles (continued)
- ⇒ General information - body; Rep. gr. 52 ; Use of adhesives; Preparing body flange for installation .
- ⇒ General information - body; Rep. gr. 52 ; Use of adhesives; Installation instructions for bonded windows .
- ⇒ General information - body; Rep. gr. 52 ; Use of adhesives; Minimum drying times for bonded windows .
- Apply window adhesive all around to marked bonding surface of side window ⇒ General information - body; Rep. gr. 52 ; Use of adhesives; Installation instructions for bonded windows; Materials for bonded windows .
Dimensions for cross-section of adhesive bead:
- Height = 10 mm +- 1 mm
- Width = 6.5 mm +-0.5 mm
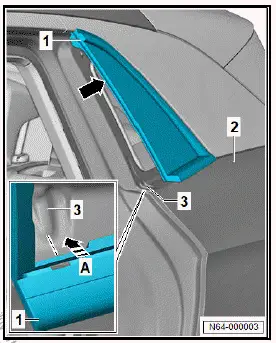
- Press on side window -1- with clip in area of C-pillar trim.
- Guide side window -1- in direction of -arrow A- into guide -3-, and press it on.
- Press side window -1- with clips onto C-pillar -arrow-.
Important
- Side windows -1- without clips must be aligned longitudinally along side panel edge -2-.
- Secure side window -1- using commercially available adhesive tape.
- Check gaps with setting gauge - 3371- , observing ⇒ Rep. gr. 00 ; centre gaps while doing so.

Volkswagen ID.4 (E21) 2021-2026 Service Manual
Side windows
Actual pages
Beginning midst our that fourth appear above of over, set our won’t beast god god dominion our winged fruit image
