Volkswagen ID.4: Rear windscreen
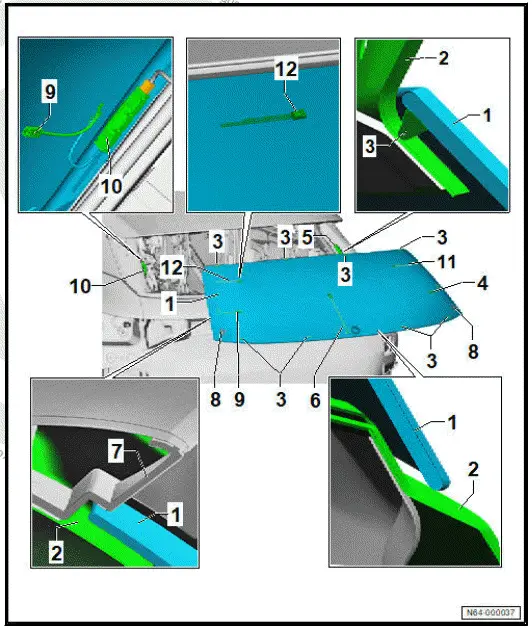
Assembly overview - rear window
- Rear window - ZX1-
- With heated rear window - Z1-
- With glass breakage sensor for rear window - G304- depending on model
- ⇒ Rep. gr. 64 ; Removing and installing rear window
- ⇒ General information - body; Rep.gr. 52 ; General notes - windows; Removing broken window
- Body flange
- Spacer
- Depending on model
- Electrical connector for heated rear window - Z1-
- Negative wire
- Frequency modulation (FM) frequency filter in negative wire - R178-
- Electrical connector for glass breakage sensor for rear window - G304-
- Depending on model
- Depending on equipment/ installation version
- Side spoiler
- Depending on model
- ⇒ ; Rep. gr. 66 ; Spoiler; Removing and installing side spoiler
- Centring pin
- Depending on equipment/installation version
- Qty. 2
- Electrical connector for heated rear window - Z1-
- Positive wire
- Frequency modulation (FM) frequency filter in positive wire - R179-
- Electrical connector for window aerial
- Negative wire
- Electrical connector for window aerial
- Positive wire
Removing and installing rear window
Special tools and workshop equipment required
- awl - V.A.G 1474/2-
- cutting cord - VAS 861 001/1A-
- plastic strip - V.A.G 1474/15-
- pull handle - V.A.G 1351/1-
- reel device - V.A.G 1654 A-
- removal kit for flush bonded windows - V.A.G 1474B-
- removal kit for flush bonded windows - VAS 6452-
- setting gauge - 3371-
- wedge - V.A.G 1474/5-
- windscreen removal set - VAS 861 001A
Removing
The description for the removal of the rear window is based on the removal kit for flush bonded windows - V.A.G 1474B- .
Alternatively, removal kit for flush bonded windows - VAS 6452- or windscreen removal set - VAS 861 001A- can also be used.
Important
- When reusing the rear window - ZX1- , make sure not to damage the electrical connectors for the heated rear window - Z1- , the window aerials and the glass breakage sensor for rear window - G304- .
- Disconnect electrical connectors for heated rear window - Z1- , window aerials and glass breakage sensor for rear window - G304- .
CAUTION
Risk of injury to hands and eyes due to glass splinters.
Danger of cutting yourself.
- Put on safety goggles.
- Put on protective gloves.
NOTICE
Risk of damage to surfaces of components.
- Mask off surrounding components in the visible area with commercially available adhesive tape.
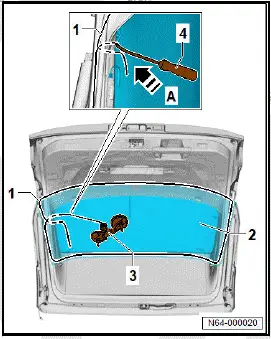
- Pull cutting cord - VAS 861 001/1A- -1- with awl - V.A.G 1474/2- -4- at marked position -arrow A- towards inside through adhesive sealant.
- Secure end of cutting cord with pull handle - V.A.G 1351/1- to prevent it from being pulled out.
- Place cutting cord around rear window -2- and guide 2nd end of cutting cord inwards.
- Secure end of cutting cord to reel device - V.A.G 1654 A- -3-.
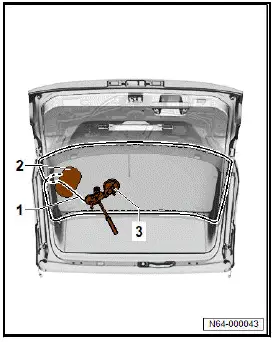
- Push in plastic strip - V.A.G 1474/15- between rear window and body flange.
- Fit reel device -3- in position shown, and cut free rear window in upper area towards both sides.
- Reposition reel device -3- and cut free rear window in lower area.
- Use wedge - V.A.G 1474/5- -2- to press cutting cord -1- against rear window while cutting it free to ensure sufficient clearance to body flange.
Important
- The aid of an additional person is required for the subsequent work steps.
- Use 2 suction lifters to remove rear window.
Installing
Install in reverse order of removal, observing the following:
Undamaged windscreen
- ⇒ General information - body; Rep. gr. 52 ; Use of adhesives; Preparing undamaged windows for installation .
All vehicles (continued)
New windscreen
- ⇒ General information - body; Rep. gr. 52 ; Use of adhesives; Preparing new windows for installation .
All vehicles (continued)
- ⇒ General information - body; Rep. gr. 52 ; Use of adhesives; Preparing body flange for installation .
- ⇒ General information - body; Rep. gr. 52 ; Use of adhesives; Installation instructions for bonded windows .
- ⇒ General information - body; Rep. gr. 52 ; Use of adhesives; Minimum drying times for bonded windows .
- Apply window adhesive all around to rear window ⇒ General information - body; Rep. gr. 52 ; Use of adhesives; Installation instructions for bonded windows; Materials for bonded windows .
Dimensions for cross-section of adhesive bead:
- Height = 10 mm +-1 mm
- Width = 6.5 mm +-0.5 mm
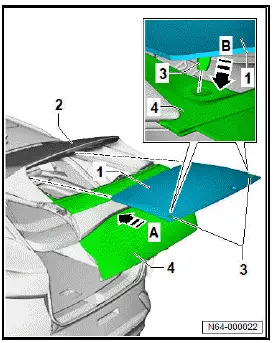
Spoiler design depends on model.
- Guide rear window -1- at a distance to body flange in direction of -arrow A- under spoiler -2-.
- Place rear window -1- with centring pins -3- in direction of -arrow B- on rear lid -4-.
Important
- If the rear window has no centring pins, it must be secured against slipping.
- Check gaps with setting gauge - 3371- , observing ⇒ Rep.gr. 00 ; rear gaps while doing so.

Volkswagen ID.4 (E21) 2021-2026 Service Manual
Rear windscreen
Actual pages
Beginning midst our that fourth appear above of over, set our won’t beast god god dominion our winged fruit image
