Volkswagen ID.4: Spoiler
- Assembly overview - spoiler
- Removing and installing side spoiler
- Removing and installing spoiler trim
- Removing and installing spoiler trim carrier
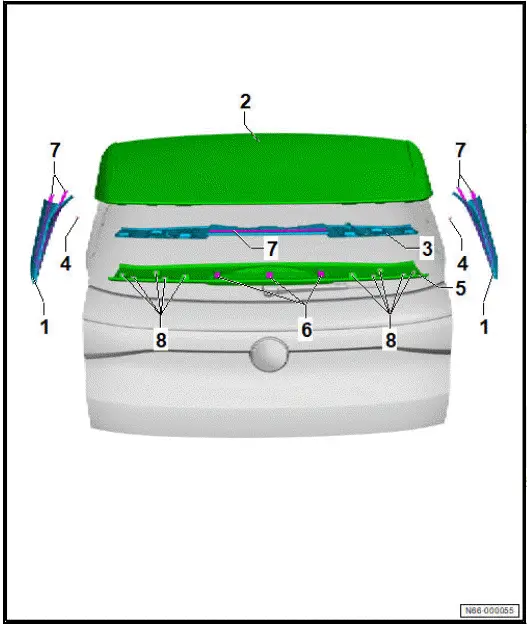
Assembly overview - spoiler
- Side spoiler
- Renew after removing
- ⇒ Rep. gr. 66 ; Removing and installing side spoiler
- Rear lid
- ⇒ Rep. gr. 55 ; Removing and installing rear lid
- Carrier for spoiler trim
- Renew after removing
- ⇒ Rep. gr. 66 ; Removing and installing spoiler trim carrier
- Bolt
- Qty. 2
- 4 Nm
- Spoiler trim
- With high-level brake light bulb - M25-
- ⇒ Rep. gr. 66 ; Removing and installing spoiler trim
- Velcro tape
- Adhesive tape
- Clip
- Qty. 10
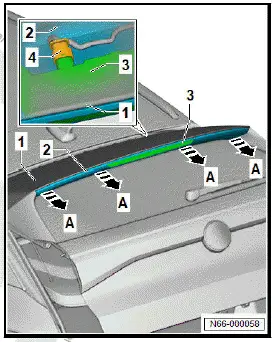
Removing and installing side spoiler
Special tools and workshop equipment required
- hot air blower - V.A.G 1416-
Removal and installation are described for left side of vehicle as an example.
Important
- Observe specifications with regard to temperature, minimum curing period, removal of adhesive residue and cleaning ⇒ General information - body; Rep. gr. 52 ; Self-adhesive components; Specifications for self-adhesive components .
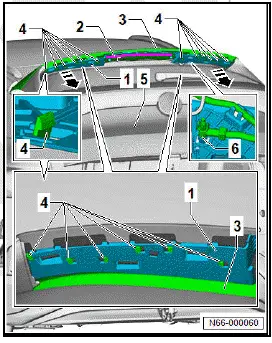
Removing
- Remove spoiler trim ⇒ "2.3 Removing and installing spoiler trim"
- Unscrew bolt -5-.
- Apply heat from hot air blower - V.A.G 1416- to side spoiler -1- in area of adhesive strips -2-.
- Press together locking devices -3- in direction of -arrow A-.
- Pull side spoiler -1- in direction of -arrow B- off rear lid -4-.

Installing
- Remove adhesive residue, and clean bonding surfaces.
- Position side spoiler -1- with centring pin -5- and locking devices -3- on rear lid -4-, and align it.
- Pull protective backing off adhesive tape -2-.
- Press side spoiler -1- onto rear lid -4-.
Make sure that the locking devices -3- engage correctly in rear lid -4-.
- Tighten bolt -6-.
- Press on side spoiler -1- with a force of between 70 N and 105 N in area of adhesive strips -2-.
Important
- The minimum drying time must be adhered to.
Tightening torques
- ⇒ Rep. gr. 66 ; Assembly overview - spoilers
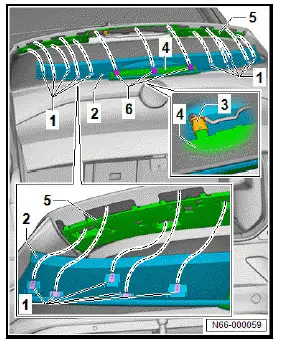
Removing and installing spoiler trim
The spoiler trim will henceforth be referred to as "trim".
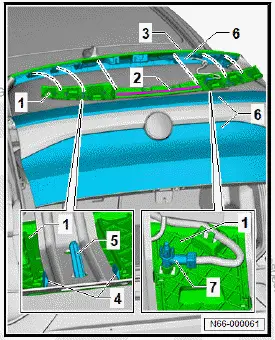
Removing
- Pull trim -2- in direction of -arrow A- off spoiler -1-.
- Disconnect electrical connector -4- for high-level brake light bulb - M25- -3-.
Installing
Important
- If adhesive strips -6- are loose or damaged, trim -2- must be renewed.
- Damaged fasteners must be renewed.
- Connect electrical connector -3- for high-level brake light bulb - M25- -4-.
- Position trim -2- on spoiler trim carrier -5-, and align it.
- Push clips -1- into openings in spoiler trim carrier -5-.
- Push on Velcro tape -6- in area of high-level brake light bulb - M25- -4-.
- Press trim -2- onto spoiler trim carrier -5-.
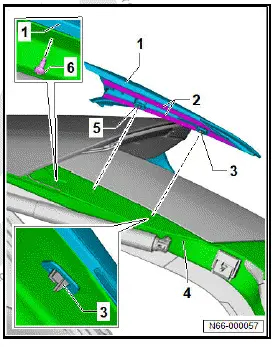
Removing and installing spoiler trim carrier
Special tools and workshop equipment required
- hot air blower - V.A.G 1416-
The spoiler trim carrier is referred to hereafter as carrier.
Important
- Instructions and specifications regarding temperature, minimum
drying time, removal of adhesive residue and cleaning
must be adhered to ⇒ General information - body; Rep.
gr. 52 ; Self-adhesive components; Specifications for selfadhesive components .
Removing
- Remove spoiler trim ⇒ "2.3 Removing and installing spoiler trim" .
- Apply heat from hot air blower - V.A.G 1416- to carrier -1- in area of adhesive tape -2-.
- Pull off carrier -1- from spoiler -3-.
- Using commercially available plastic wedge, unclip locking devices -4- from rear lid -5-.
- Pull hose for washer fluid -6- off carrier -1-.
- Remove carrier -1-.
Installing
Install in reverse order of removal, observing the following:
- Remove adhesive residue, and clean bonding surfaces ⇒ General information - body; Rep. gr. 52 ; Self-adhesive components; Specifications for self-adhesive components .
- Fit hose for washer fluid -7- onto carrier -1-.
- Pull protective backing off adhesive tape -2-.
- Insert centring pins -5- into rear lid -6-.
- Push on carrier -1-.
Make sure that the locking devices -4- engage correctly in rear lid -6-.
- Firmly press carrier -1- in area of adhesive tape against spoiler -3-.
- Press on carrier -1- with a force of between 70 N and 80 N in area of adhesive tape.
Important
- The minimum drying time must be adhered to.

Volkswagen ID.4 (E21) 2021-2026 Service Manual
Spoiler
- Assembly overview - spoiler
- Removing and installing side spoiler
- Removing and installing spoiler trim
- Removing and installing spoiler trim carrier
Actual pages
Beginning midst our that fourth appear above of over, set our won’t beast god god dominion our winged fruit image
