Volkswagen ID.4: Underbody cladding
- Assembly overview - underbody cladding, 55, 62 kWh
- Assembly overview - underbody cladding, 82 kWh
- Assembly overview - underbody cladding, 82 kWh, GTX
- Removing and installing high-voltage battery skid plate, 55, 62 kWh
- Removing and installing high-voltage battery skid plate, 82 kWh
- Removing and installing side underbody cladding, 82 kWh
- Removing and installing rear underbody cladding
- Removing and installing underbody towing eye
- Removing and installing power unit skid plate
Assembly overview - underbody cladding, 55, 62 kWh
Assembly overview - underbody cladding
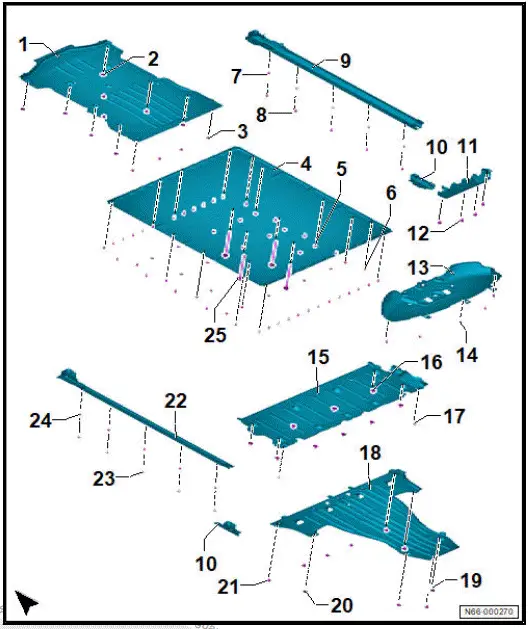
- Front underbody cladding
- ⇒ Rep. gr. 66 ; Removing and installing front underbody cladding
- Bolt
- Qty. 9
- 2 Nm
- Clip
- Qty. 4
- Skid plate, high-voltage battery
- ⇒ Rep. gr. 66 ; Removing and installing skid plate for high-voltage battery
- Bolt
- Repair stages ⇒ Electronic parts catalogue (ETKA)
- Qty. 35
- Renew after removing
- ⇒ Rep. gr. 66 ; Removing and installing high-voltage battery skid plate, 55, 62 kWh
- Nut
- Qty. 22
- 8 Nm +30º
- Expanding nut
- Qty. 5
- Renew after removing
- Bolt
- Qty. 5
- 2 Nm
- Side underbody cladding/side skid plate
- Depending on equipment/version
- ⇒ Rep. gr. 66 ; Removing and installing side underbody cladding
- Cover
- Left and right
- ⇒ Rep. gr. 66 ; Removing and installing underbody cladding, centre
- Underbody protection
- Shape varies depending on model
- ⇒ Rep. gr. 66 ; Removing and installing skid plate
- Bolt
- Quantity varies depending on model
- Qty. 3 or 4
- M8 or M10
- M8 = 20 Nm
- M10 = 55 Nm
- Rear underbody cladding
- Shape varies depending on model
- ⇒ Rep. gr. 66 ; Removing and installing rear underbody cladding
- Bolt
- Quantity varies depending on model
- Qty. 5 or 9
- 2 Nm
- Centre underbody cladding
- ⇒ Rep. gr. 66 ; Removing and installing underbody cladding, centre
- Nut
- Qty. 9
- 2 Nm
- Expanding nut
- Qty. 2
- Rear centre underbody cladding
- ⇒ Rep. gr. 66 ; Removing and installing underbody cladding, rear centre
- Clip
- Qty. 3
- Bolt
- Qty. 2
- 8 Nm
- Bolt
- Qty. 5
- 2 Nm
- Side underbody cladding/side skid plate
- Depending on equipment/version
- ⇒ Rep. gr. 66 ; Removing and installing side underbody cladding
- Bolt
- Qty. 5
- 2 Nm
- Expanding nut
- Qty. 5
- Renew after removing
- Bolt
- Qty. 4
- ⇒ Electric rear-wheel drive EIP220 and all-wheel drive EIA200, EIP220; Rep. gr. 93 ; High-voltage battery unit; Assembly overview - installed high-voltage battery, 82 kWh; Assembly overview - installed high-voltage battery
Assembly overview - underbody cladding, 82 kWh
Assembly overview - underbody cladding
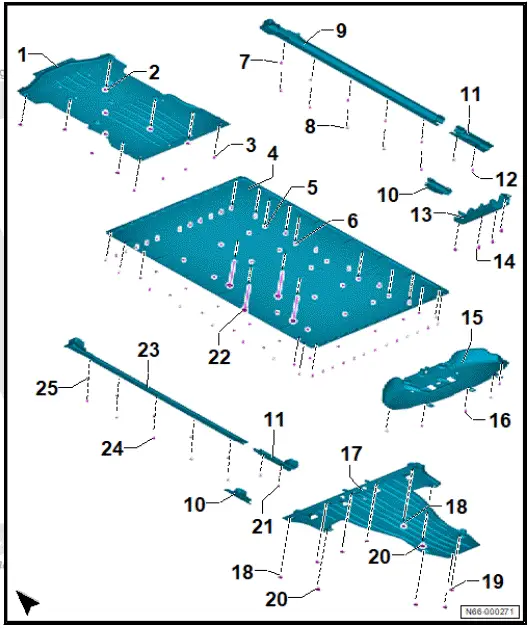
- Front underbody cladding
- ⇒ Rep. gr. 66 ; Removing and installing front underbody cladding
- Bolt
- Qty. 9
- 2 Nm
- Clip
- Qty. 4
- Skid plate, high-voltage battery
- ⇒ Rep. gr. 66 ; Removing and installing high-voltage battery skid plate, 82 kWh
- Nut
- Qty. 34
- Renew after removing
- 8 Nm +30º
- Bolt
- Repair stages ⇒ Electronic parts catalogue (ETKA)
- Qty. 39
- Renew after removing
- ⇒ Rep. gr. 66 ; Removing and installing high-voltage battery skid plate, 82 kWh
- Expanding nut
- Qty. 5
- Renew after removing
- Bolt
- Qty. 5
- 2 Nm
- Side underbody cladding/side skid plate
- Depending on equipment/version
- ⇒ Rep. gr. 66 ; Removing and installing side underbody cladding
- Cover
- Left and right
- ⇒ Rep. gr. 66 ; Removing and installing side underbody cladding
- Rear side member trim/skid plate support
- Depending on equipment/version
- ⇒ Rep. gr. 66 ; Removing and installing side underbody cladding
- Bolt
- Qty. 2
- 2 Nm
- Underbody protection
- Shape varies depending on model
- ⇒ Rep. gr. 66 ; Removing and installing skid plate
- Bolt
- Quantity varies depending on model
- Qty. 3 or 4
- M8 or M10
- M8 = 20 Nm
- M10 = 55 Nm
- Rear underbody cladding
- Shape varies depending on model
- ⇒ Rep. gr. 66 ; Removing and installing rear underbody cladding
- Bolt
- Qty. 5
- 2 Nm
- Rear centre underbody cladding
- ⇒ Rep. gr. 66 ; Removing and installing underbody cladding, rear centre
- Clip
- Qty. 5
- Clip
- Qty. 3
- Bolt
- Qty. 2
- 8 Nm
- Bolt
- Qty. 2
- 2 Nm
- Bolt
- Qty. 4
- ⇒ Electric rear-wheel drive EIP220 and all-wheel drive EIA200, EIP220; Rep. gr. 93 ; High-voltage battery unit; Assembly overview - installed high-voltage battery, 82 kWh; Assembly overview - installed high-voltage battery
- Side underbody cladding/side skid plate
- Depending on equipment/version
- ⇒ Rep. gr. 66 ; Removing and installing side underbody cladding
- Bolt
- Qty. 5
- 2 Nm 25 - Expanding nut
- Qty. 5
- Renew after removing
Assembly overview - underbody cladding, 82 kWh, GTX
Assembly overview - underbody cladding
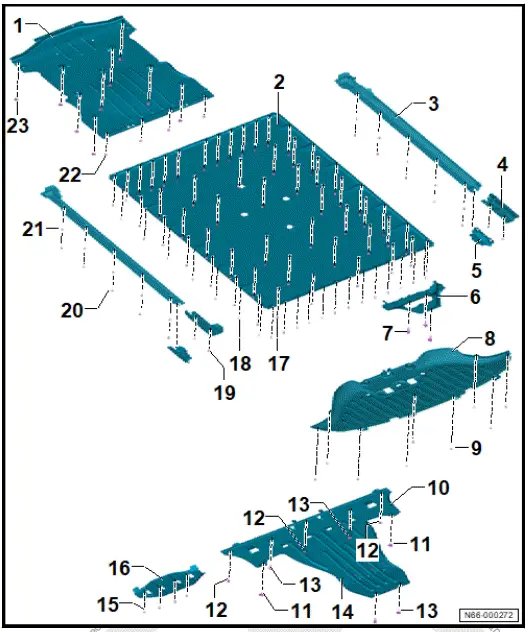
- Front underbody cladding
- ⇒ Rep. gr. 66 ; Removing and installing front underbody cladding
- Skid plate, high-voltage battery
- ⇒ Rep. gr. 66 ; Removing and installing skid plate for high-voltage battery
- Side underbody cladding/ side skid plate
- Depending on equipment/ version
- ⇒ Rep. gr. 66 ; Removing and installing side underbody cladding
- Rear side member trim/ skid plate support
- Depending on equipment/ version
- ⇒ Rep. gr. 66 ; Removing and installing side underbody cladding
- Cover
- Left and right
- ⇒ Rep. gr. 66 ; Removing and installing side underbody cladding
- Underbody protection
- ⇒ Rep. gr. 66 ; Removing and installing skid plate
- Bolt
- Qty. 3
- M8 or M10
- M8 = 20 Nm
- M10 = 55 Nm
- Rear underbody cladding
- ⇒ Rep. gr. 66 ; Removing and installing rear underbody cladding
- Bolt
- Qty. 9
- 2 Nm
- Rear power unit skid plate
- ⇒ Rep. gr. 66 ; Removing and installing power unit skid plate
- Bolt
- Qty. 2
- 8 Nm
- Clip
- Qty. 3
- Bolt
- Qty. 2
- 20 Nm
- Speed nut
- Qty. 4
- Bolt
- Depending on equipment/version
- Qty. 4
- 2 Nm
- Power unit skid plate
- Depending on equipment/version
- ⇒ Rep. gr. 66 ; Removing and installing power unit skid plate
- Nut
- Qty. 34
- Renew after removing
- 8 Nm +30º
- Bolt
- Repair stages ⇒ Electronic parts catalogue (ETKA)
- Qty. 39
- Renew after removing
- ⇒ Rep. gr. 66 ; Removing and installing high-voltage battery skid plate, 82 kWh
- Bolt
- Qty. 4
- 2 Nm
- Bolt
- Qty. 10
- 2 Nm
- Expanding nut
- Qty. 10
- Renew after removing
- Clip
- Qty. 4
- Bolt
- Qty. 9
- 2 Nm
Removing and installing high-voltage battery skid plate, 55, 62 kWh
Removing and installing skid plate for high-voltage battery
Special tools and workshop equipment required
- 16 mm hexagon socket bit - VAS 262 017-
Removing
NOTICE
Damage to the thread is possible when unscrewing the bolts.
- Unscrew the bolts with slowly increasing speed
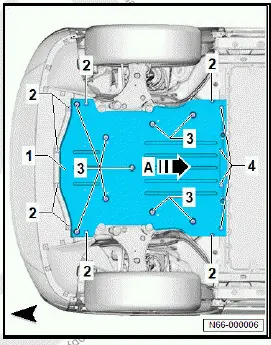
- Unscrew bolts -1-.
- Unscrew bolts -4- using 16 mm hexagon socket bit - VAS 262 017- .
- Unscrew nuts -3-.
Important
- The aid of an additional person is required for the subsequent work steps.
- Pull skid plate for high-voltage battery -2- out in direction of -arrow- and detach.
Installing
Install in reverse order of removal, observing the following:
Tightening torques
Specified torque for flow-drill screws
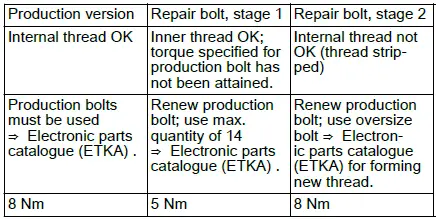
- ⇒ Rep. gr. 66 ; Assembly overview - underbody cladding, 55, 62 kWh
- ⇒ Electric rear-wheel drive EIP220 and all-wheel drive EIA200, EIP220; Rep. gr. 93 ; High-voltage battery unit; Assembly overview - installed high-voltage battery, 82 kWh; Assembly overview - installed high-voltage battery
Removing and installing high-voltage battery skid plate, 82 kWh
Removing and installing skid plate for high-voltage battery
Special tools and workshop equipment required
- 16 mm hexagon socket bit - VAS 262 017-
Removing
NOTICE
Damage to the thread is possible when unscrewing the bolts.
- Unscrew the bolts with slowly increasing speed
- Unscrew bolts -4- using 16 mm hexagon socket bit - VAS 262 017- .
- Unscrew bolts -1-.
- Unscrew nuts -3-.
Important
- The aid of an additional person is required for the subsequent work steps.
- Pull skid plate for high-voltage battery -2- out in direction of -arrow- and detach.

Installing
Install in reverse order of removal, observing the following:
Tightening torques
Specified torque for flow-drill screws
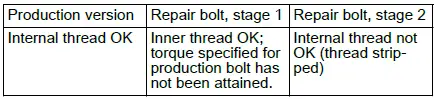
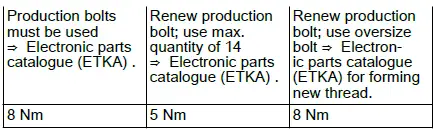
- ⇒ Rep. gr. 66 ; Assembly overview - underbody cladding, 82 kWh
- ⇒ Electric rear-wheel drive EIP220 and all-wheel drive EIA200, EIP220; Rep. gr. 93 ; High-voltage battery unit; Assembly overview - installed high-voltage battery, 82 kWh; Assembly overview - installed high-voltage battery
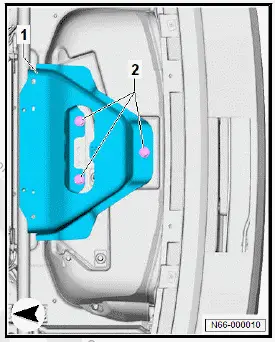
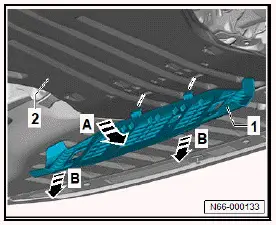
Removing and installing front underbody cladding
Removing
- Unscrew bolts -2- and -3-.
- Unclip clips -4-.
- Pull front underbody cladding -1- in direction of -arrow A- out of bumper cover, and remove it.
Installing
- Install in reverse order of removal, observing the following:
Important
- Middle bolt must be started first.
Tightening torques
- ⇒ Rep. gr. 66 ; Assembly overview - underbody cladding
- ⇒ Rep. gr. 66 ; Assembly overview - front wheel housing liner
- ⇒ Rep. gr. 63 ; Assembly overview - bumper cover
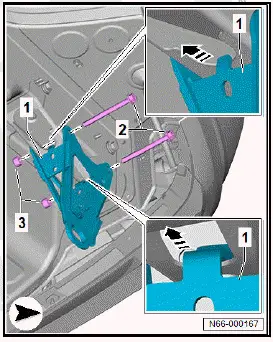
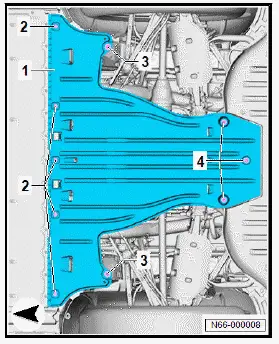
Removing and installing side underbody cladding, 55 kWh, 62 kWh
Removing and installing side underbody cladding
Removal and installation are described for the right vehicle side as an example.
Removing
Removing side underbody cladding
- Unclip cover -1-.
- Unscrew bolts -2-.
- Remove expanding nuts -2-.
- Remove side underbody cladding -3-.
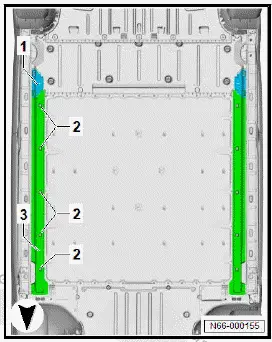
Installing
Install in reverse order of removal, observing the following:
Tightening torques
- ⇒ Rep. gr. 66 ; Assembly overview - underbody cladding
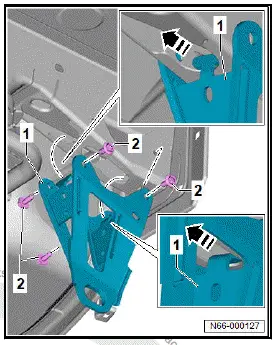
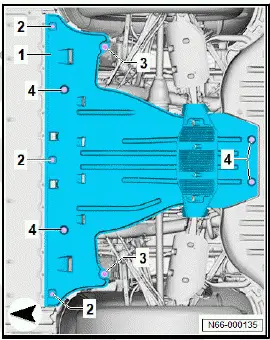
Removing and installing side underbody cladding, 82 kWh
Removing and installing side underbody cladding
Removal and installation are described for the right vehicle side as an example.
Removing
Remove side underbody cladding
- Unclip cover -1-.
- Unscrew bolts -3-.
- Remove expanding nuts -3-.
- Remove side underbody cladding -5-.
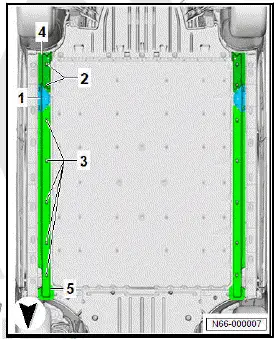
Remove rear side member trim/skid plate support
- Unscrew bolts -2-.
- Detach rear side member trim -4-.
Installing
Install in reverse order of removal, observing the following:
Tightening torques
- ⇒ Rep. gr. 66 ; Assembly overview - underbody cladding, 82 kWh
Removing and installing centre underbody cladding
Removing
- Unclip covers -3-.
- Unscrew nuts -4-.
- Unscrew bolts -5- and -6-.
- Unclip expanding nuts -2-.
- Pull out centre underbody cladding -1- in direction of -arrow A-.
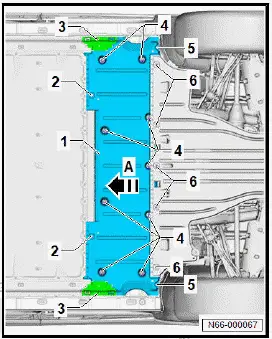
Installing
Install in reverse order of removal, observing the following:
Tightening torques
- ⇒ Rep. gr. 66 ; Assembly overview - underbody cladding
Removing and installing rear underbody cladding
Removing
- Remove rear centre underbody cladding ⇒ Rep. gr. 66 ; Removing and installing rear centre underbody cladding .
- Unscrew bolts -2-.
- Pull rear underbody cladding -1- in direction of -arrow A- out of bumper cover, and remove it.

Installing
Install in reverse order of removal, observing the following:
Tightening torques
- ⇒ Rep. gr. 66 ; Assembly overview - underbody cladding
- ⇒ Rep. gr. 66 ; Assembly overview - rear wheel housing liner
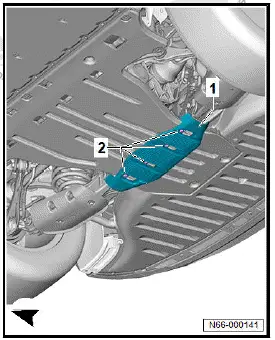
Removing and installing skid plate
Removing
- Remove rear underbody cladding ⇒ Rep. gr. 66 ; Removing and installing rear underbody cladding .
- Unscrew bolts -2-.
- Remove skid plate -1-.
Installing
Install in reverse order of removal, observing the following:
Tightening torques
- ⇒ Rep. gr. 66 ; Assembly overview - underbody cladding
Removing and installing underbody towing eye
Removing
- Remove rear underbody cladding ⇒ Rep. gr. 66 ; Removing and installing rear underbody cladding .
Underbody towing eye with four M8 bolts
- Remove bolts -2-.
- Detach underbody towing eye -1- in direction of -arrow-.
- Remove underbody towing eye -1-.
All vehicles (continued)
Underbody towing eye with two M10 bolts
- Remove bolts -2-.
- Detach underbody towing eye -1- in direction of -arrow-.
- Remove underbody towing eye -1-.
All vehicles (continued)
Installing
Further installation is carried out in reverse order of removal.
Observe the following when doing this:
Tightening torques
Removing and installing power unit skid plate
Skid plate for power unit protection is referred to hereafter as skid plate.
Removing
- Unscrew bolts -2-.
- Turn skid plate in direction of -arrow A- and remove from guides in direction of -arrow B-.
Installing
Further installation is carried out in reverse order of removal.
Observe the following when doing this:
Tightening torques
- ⇒ Rep. gr. 66 ; Assembly overview - underbody cladding, 82 kWh, GTX
Removing and installing power unit skid plate
Removing and installing underbody cladding, rear centre
Removing and installing power unit skid plate
Removing
- Unscrew bolts -3- and -4-.
- Unclip clips -2-.
- Remove rear power unit skid plate -1-.
Installing
Install in reverse order of removal, observing the following:
Tightening torques
- ⇒ Rep. gr. 66 ; Assembly overview - underbody cladding, 82 kWh, GTX
Removing and installing underbody cladding, rear centre
Removing and installing rear centre underbody cladding
Removing
- Unscrew bolts -3- and -4-.
- Unclip clips -2-.
- Remove rear centre underbody cladding -1-.
Installing
Install in reverse order of removal, observing the following
Tightening torques
- ⇒ Rep. gr. 66 ; Assembly overview - underbody cladding

Volkswagen ID.4 (E21) 2021-2026 Service Manual
Underbody cladding
- Assembly overview - underbody cladding, 55, 62 kWh
- Assembly overview - underbody cladding, 82 kWh
- Assembly overview - underbody cladding, 82 kWh, GTX
- Removing and installing high-voltage battery skid plate, 55, 62 kWh
- Removing and installing high-voltage battery skid plate, 82 kWh
- Removing and installing side underbody cladding, 82 kWh
- Removing and installing rear underbody cladding
- Removing and installing underbody towing eye
- Removing and installing power unit skid plate
Actual pages
Beginning midst our that fourth appear above of over, set our won’t beast god god dominion our winged fruit image
